Installing DSF Packager
After making all the required configurations such as port, username, log level, and so on, you must deploy the WAR files into an Application server. This section explains how to deploy the WAR files in JBoss and WebSphere application servers.
Deploying in JBoss Application Server
The below steps guide you to deploy the WAR files in JBoss application server.
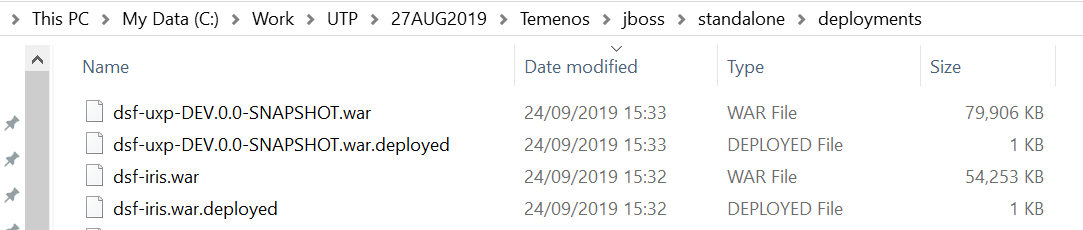
- Place the following WAR files in the deployments folder and start the JBoss application server.
- dsf-uxp.war
- dsf-iris.war
- irf-t24catalog-services.war
- Ensure the WAR files are deployed successfully.

Deploying in WebSphere Application Server
To deploy the WAR files in WebSphere Application Server (WAS), ensure WAS profile is configured for TAFJ and TAFJJEE_EAR.ear is deployed. For more information, see the TAFJ-AS WebSPhereInstall user guide and the Configuring Application Server section.
Configuring WebSphere Application Server
Before deploying the modified dsf-iris.war and dsf.uxp.war files, you must perform the following steps:
 Configuring IBM Console
The below steps guide you to configure IBM console.
- Login to https://localhost:9043/ibm/console/.
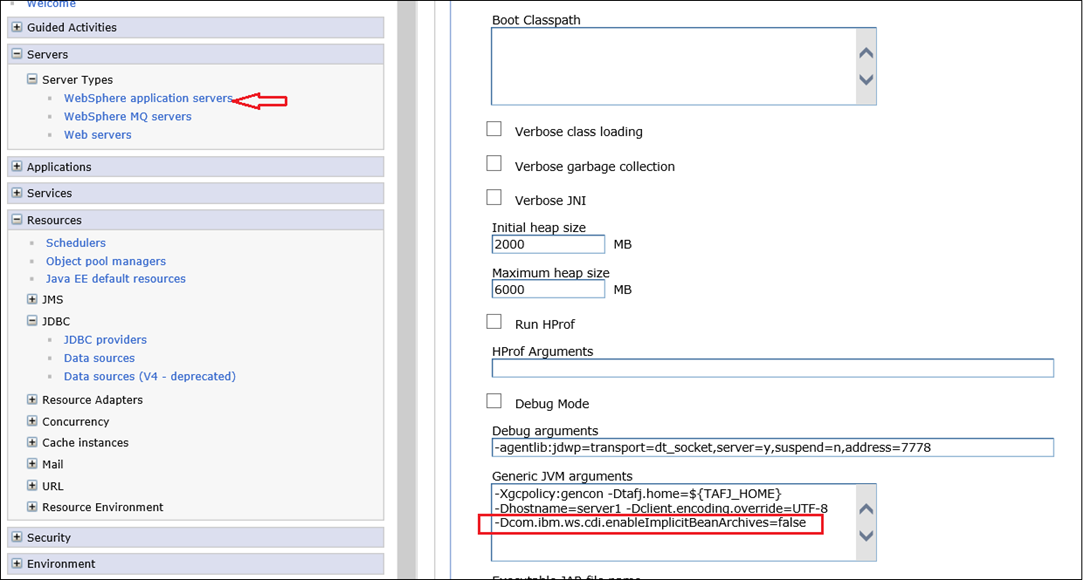
- Go to Servers > Server Types > WebSphere application servers and click the server1 link.
- Go to Java and Process Management > Process definition > Java Virtual Machine.
- Under Generic JVM arguments, add the following:
-Dcom.ibm.ws.cdi.enableImplicitBeanArchives=false
Configuring Temenos Transact Library
The below steps guide you to configure Temenos Transact library.
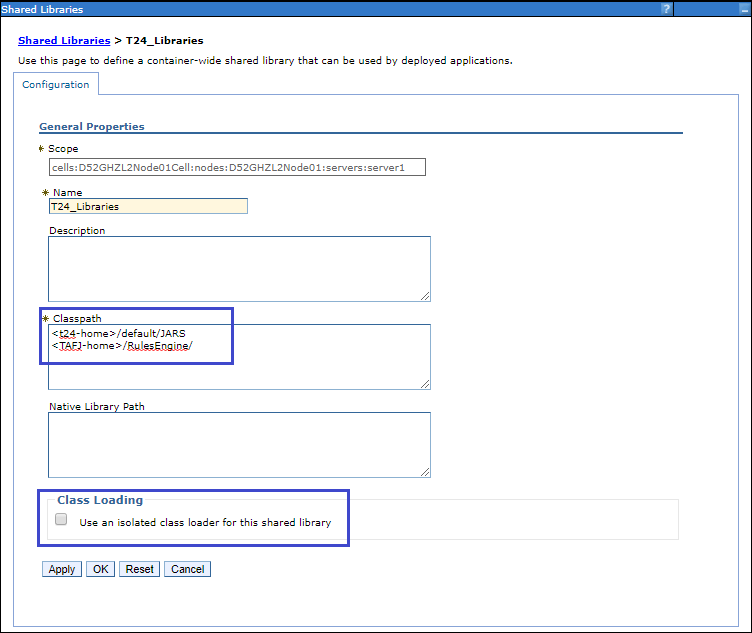
- Ensure Temenos Transact library paths are configured properly for the following variables:
- <t24-home>/default/JARS
- <TAFJ-home>/RulesEngine/
- Under Class Loading, clear the use an isolated class loader for this shared library check box.
Configuring TAFJ Library
The below steps guide you to configure TAFJ library.
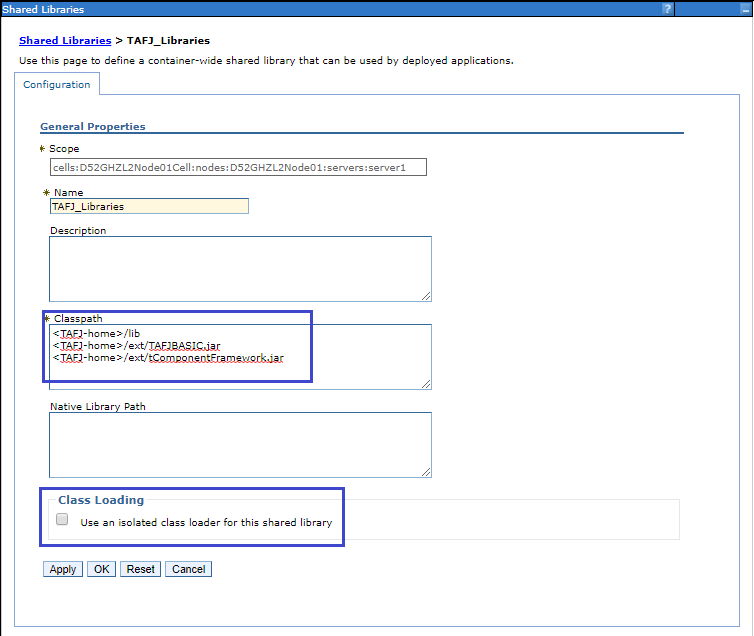
- Ensure the following TAFJ Library paths are configured properly.
- <TAFJ-home>/lib
- <TAFJ-home>/ext/TAFJBASIC.jar
- <TAFJ-home>/ext/tComponentFramework.jar
- <TAFJ-home>/ext/json-simple.jar
- Uncheck the Class Loading option use an isolated class loader for this shared library.
- Verify WebSphere variables are pointing to TAFJ-T24 area correctly.

Configuring WAR Files
Configuring irf-t24catalog-service.war
In irf-t24catalog-services/WEB-INF/classes, modify the following properties:
- RemoteConnectionPorts=2810. This is entered by referring to AboutThisProfile.txt and finding the value for Bootstrap Port.
- RemoteServerType=Websphere_AS_8.5
- invocationMethod=EJBRemote
Configuring dsf-iris.war
The below steps guide you to configure dsf-iris.war.
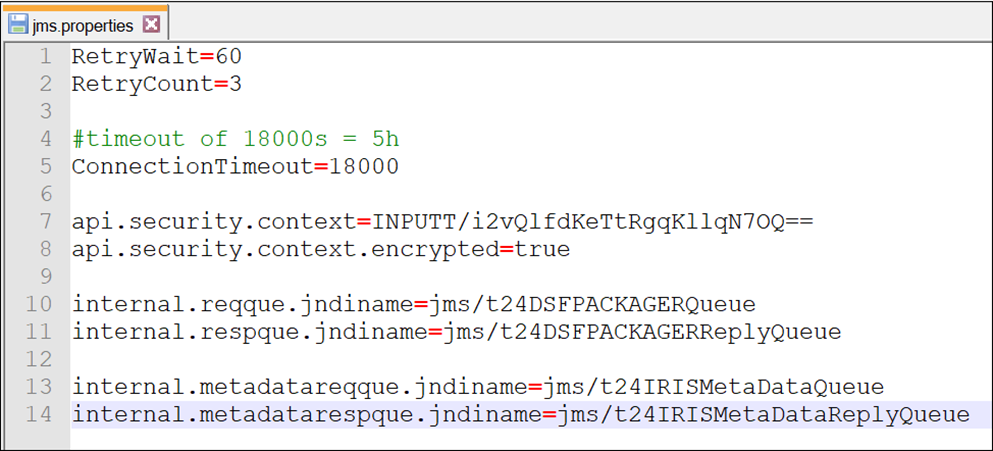
- In dsf-iris.war/WEB-INF/classes, open the jms.properties file and update as given below:
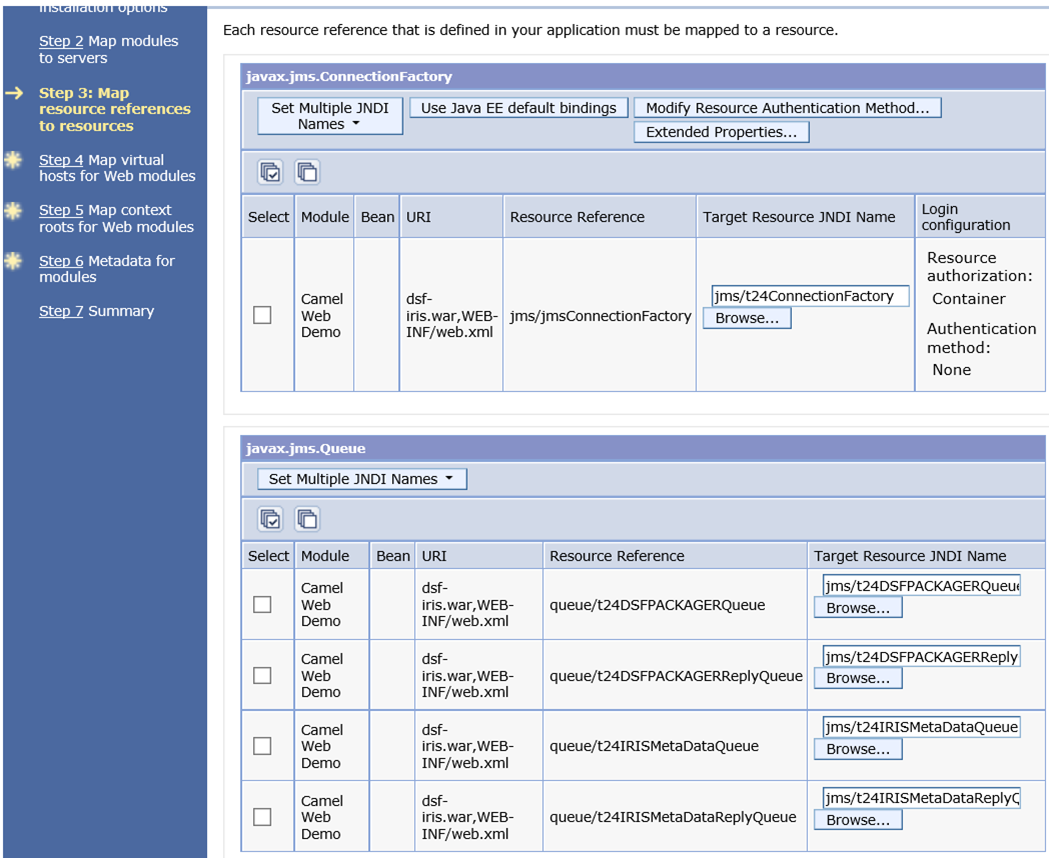
- internal.reqque.jndiname=jms/t24DSFPACKAGERQueue
- internal.respque.jndiname=jms/t24DSFPACKAGERReplyQueue
- internal.metadatareqque.jndiname=jms/t24IRISMetaDataQueue
- internal.metadatarespque.jndiname=jms/t24IRISMetaDataReplyQueue
- In dsf-iris.war/WEB-INF/classes, open log4j.properties and set log4j.appender.logFile.File= <location of dsf-iris log path>. log4j.appender.logFile.File=C:/IBMWebsphere/AppSerInstallDir/profiles/AppSrv01/logs/server1/dsf-iris.log
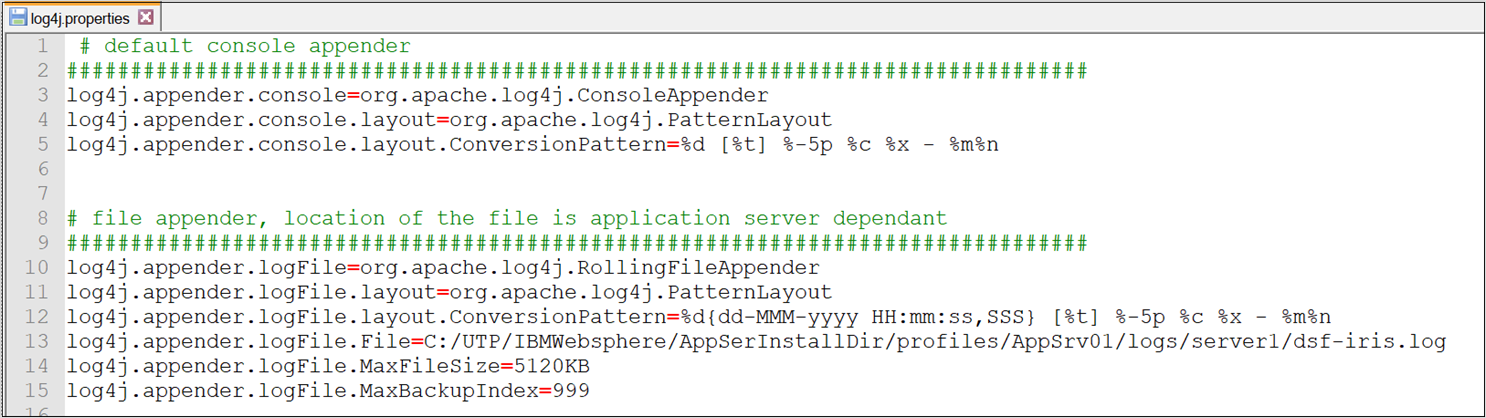
- Similarly, add dsf-ofs.log and dsf-package.log files path.
log4j.appender.logFile.File=C:/IBMWebsphere/AppSerInstallDir/profiles/AppSrv01/logs/server1/dsf-ofs.log
log4j.appender.logFile.File=C:/IBMWebsphere/AppSerInstallDir/profiles/AppSrv01/logs/server1/dsf-package.log
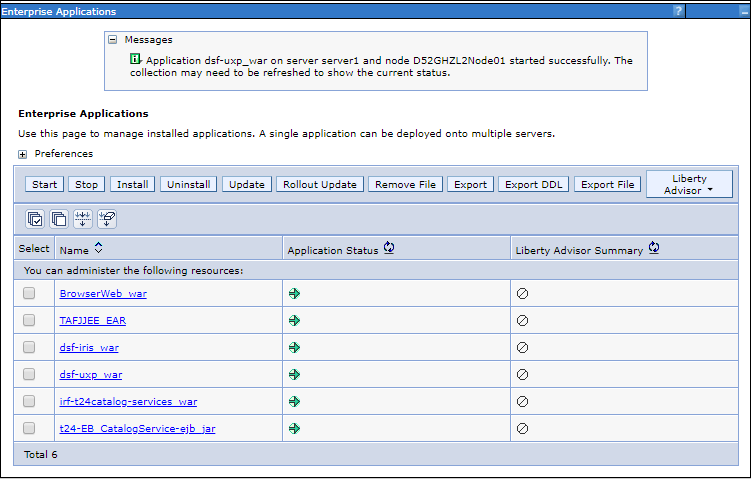
After deploying all the WAR and JAR files, the server instance appears as shown below:
Installation of WAR and JAR Files
The following sections guide you in installing WAR and JAR files.
Installing t24-EB_CatalogService-ejb.jar
The below steps guide you to install t24-EB_CatalogService-ejb.jar.
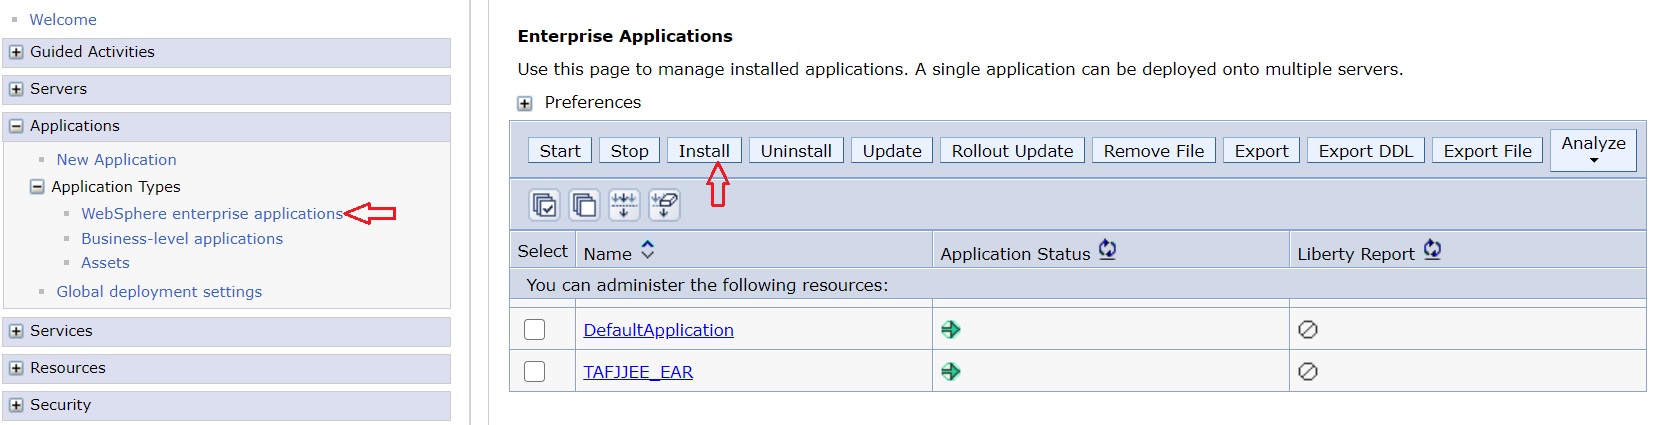
- In the IBM console, go to Application > Application Types > WebSphere enterprise applications and then click Install.
- From the Application name drop-down list, select t24-EB_CatalogService-ejb.jar and then save the changes.
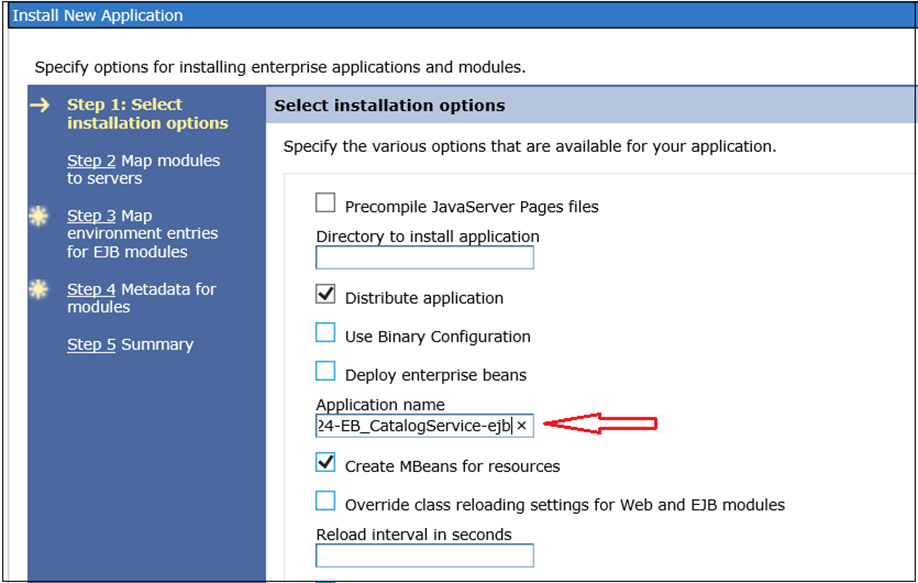 On the .jar file, press the F2 key to copy the exact file name and paste it in Application Name field. File name is case sensitive.
- For each step, click Next and save the changes.
- Go to Application > Application Types > WebSphere enterprise applications and click the t24-EB_CatalogService-ejb link.
The following screen is displayed:
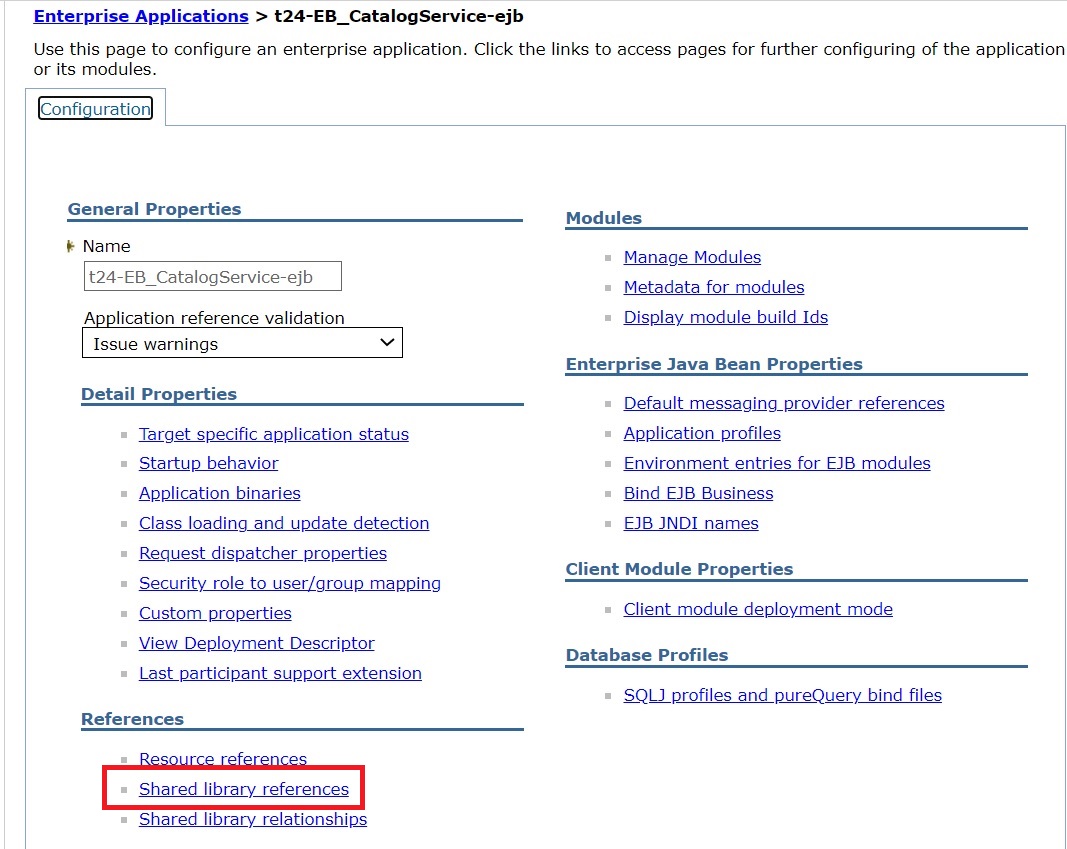
- Click the Shared library references link and select t24-EB_CatalogService-ejb.
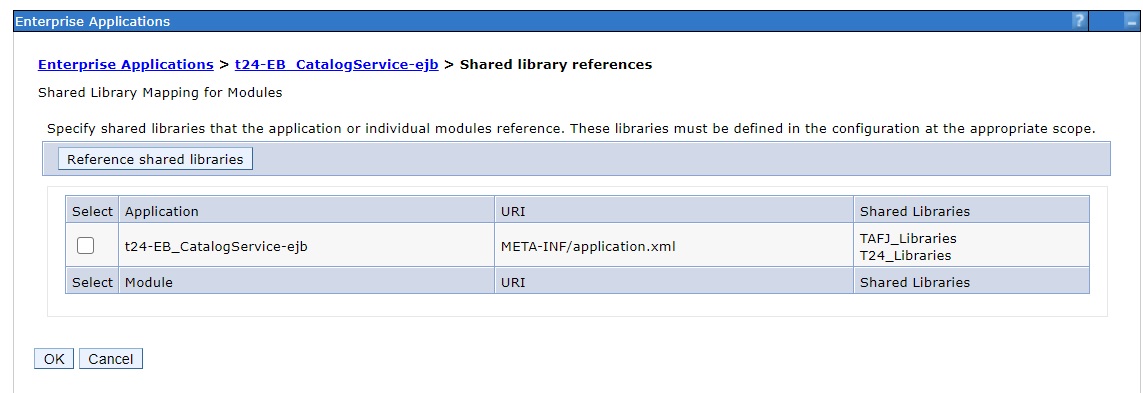
- Click Reference shared libraries.
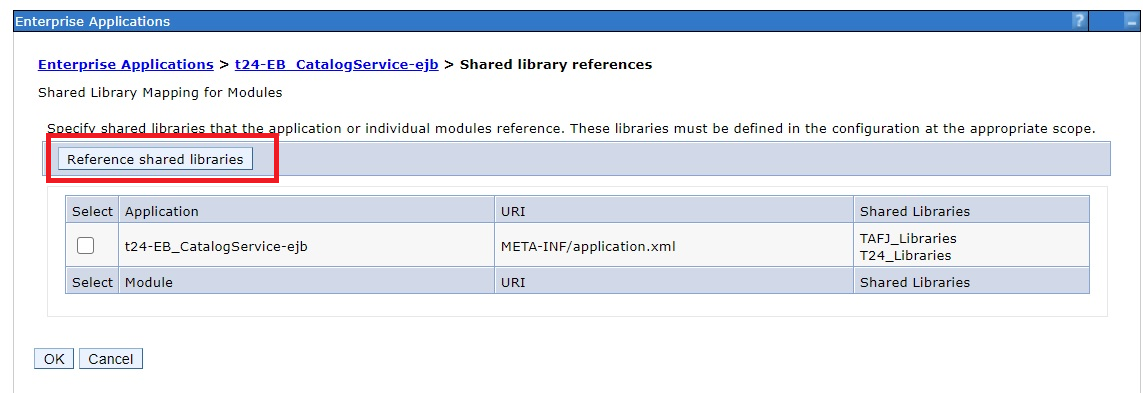
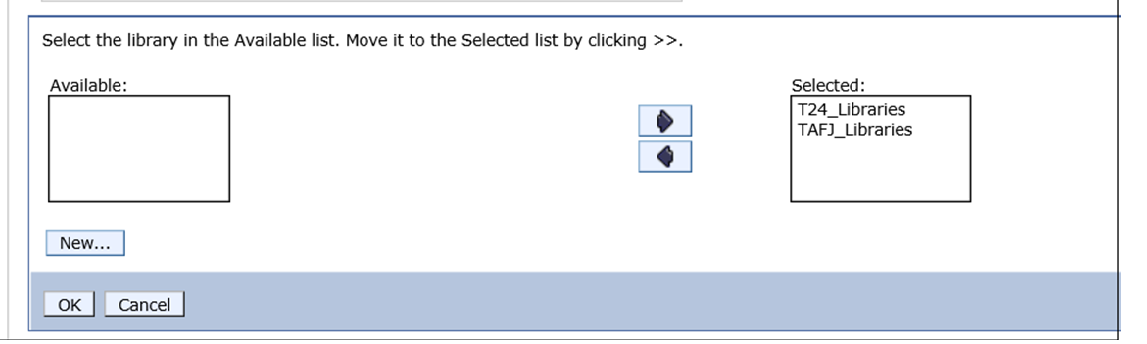
- Select the following libraries and save the selection.
- T24_Libraries
- TAFJ_Libraries.
- Click the t24-EB_CatalogService-ejb link and then click Bind EJB Business.
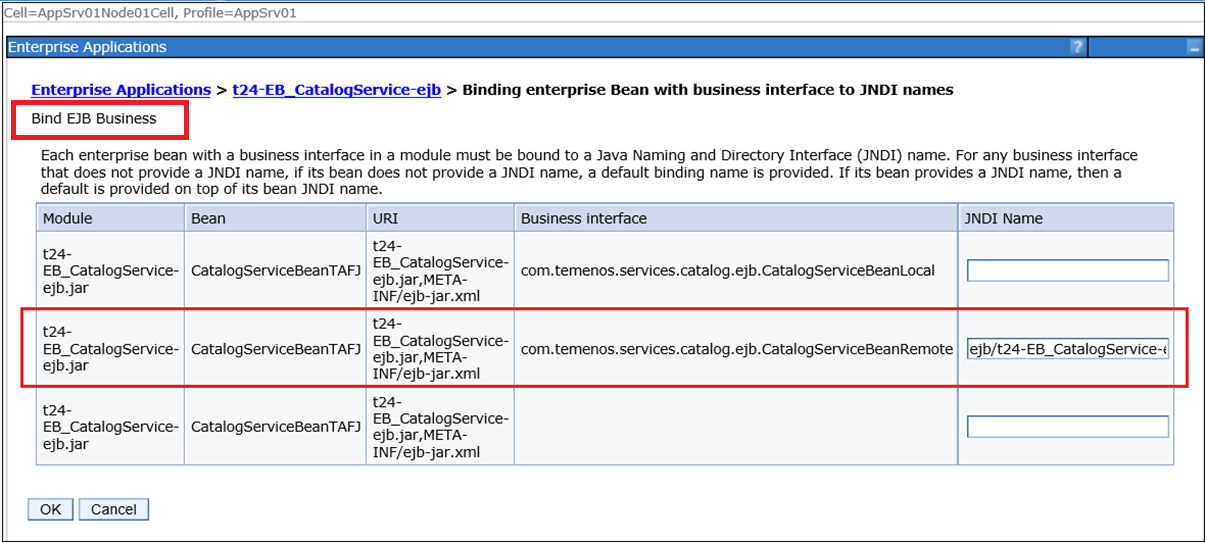
- For t24-EB_CatalogService-ejb.jar Module, provide the JNDI Name as follows:
ejb/t24-EB_CatalogService-ejb/t24-EB_CatalogService-ejb.jar/CatalogServiceBeanTAFJ#com.temenos.services.catalog.ejb.CatalogServiceBeanRemote
- Click the t24-EB_CatalogService-ejb link, the following screen is displayed.
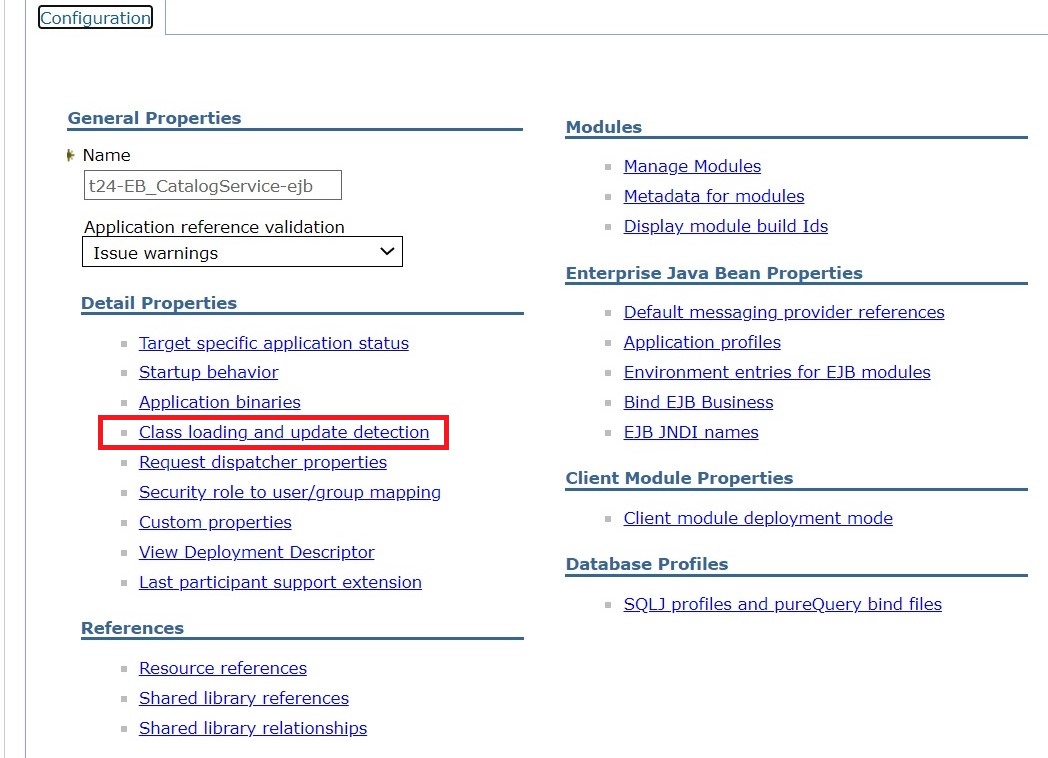
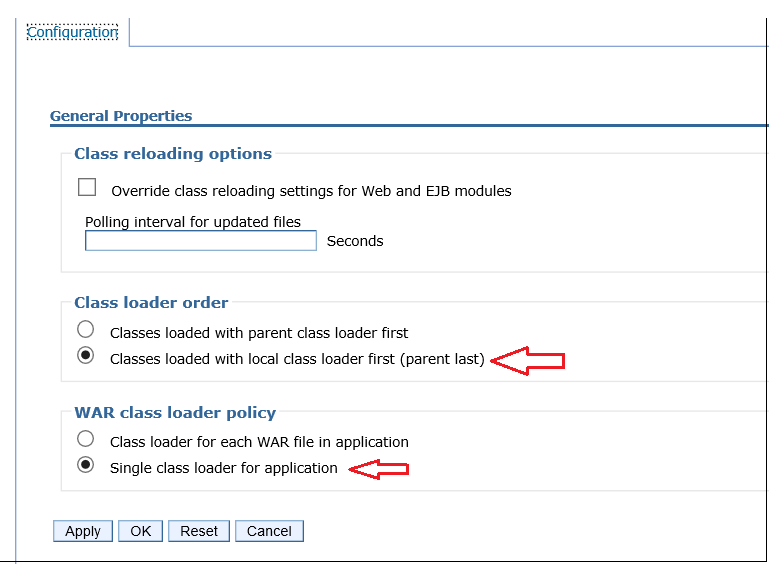
- Click Class loading and update detection to select the following options and then save the changes:
- Classes loaded with local class loader first (parent last)
- Single class loader for application
Installing irf-t24catalog-services.war
The below steps guide you to install irf-t24-catalog-service.war.
- In the IBM console, go to Application > Application Types > WebSphere enterprise applications and then click install.
- Select irf-t24catalog-services.war and then click Next.
- Enter the context root /irf-t24catalog-services and then save the changes.
- Click the irf-t24catalog-services link. The following screen is displayed.
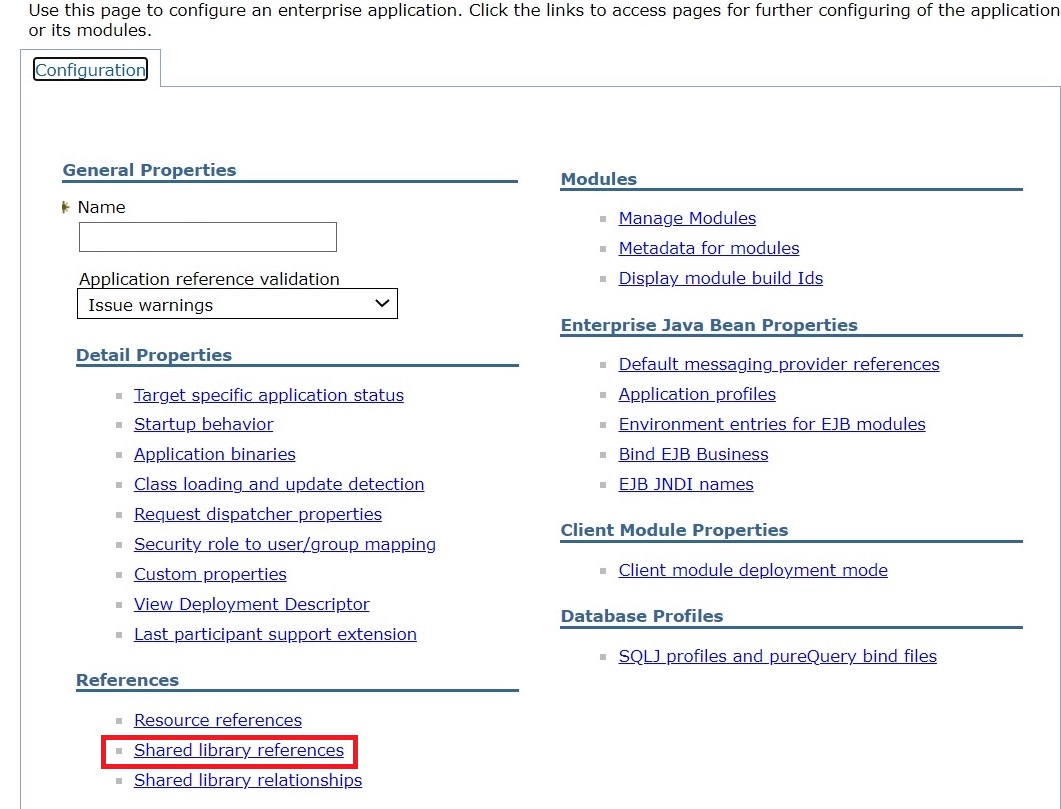
- Click the Shared library references link and select irf-t24catalog-services.
- Click Reference Shared Libraries to select the following libraries and save the changes:
- T24_Libraries
- TAFJ_Libraries.
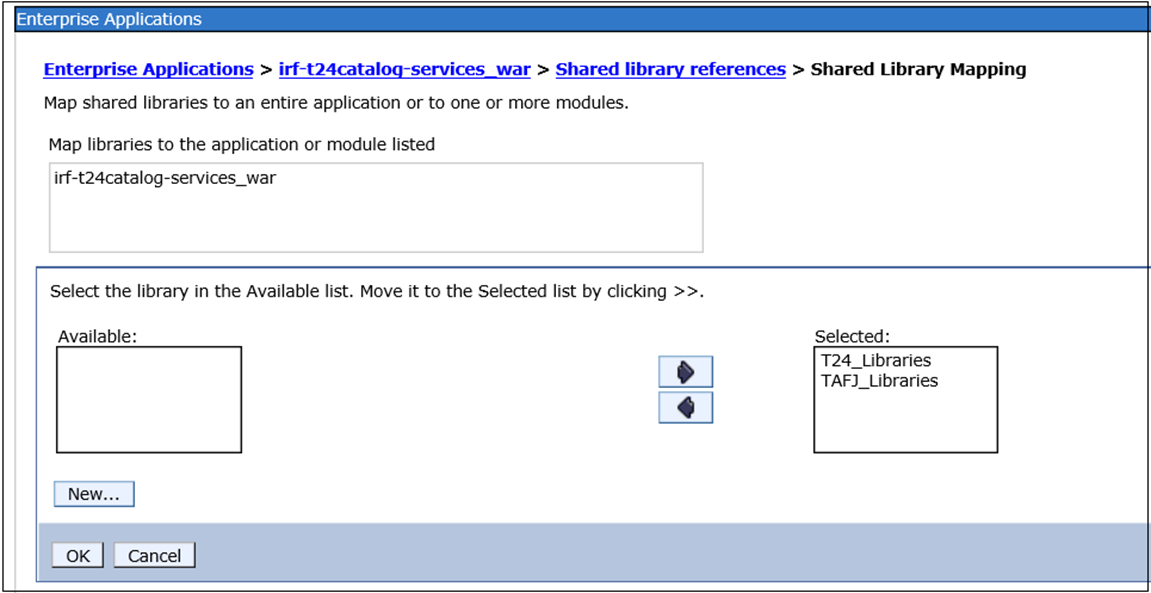
- Go to the irf-t24catalog-services link, the following screen is displayed.
- Click Class loading and update detection and then select the following options:
- Under class loader order, select Classes loaded with parent class loader first
- Under WAR class loader policy, select Class loader for each WAR file in application
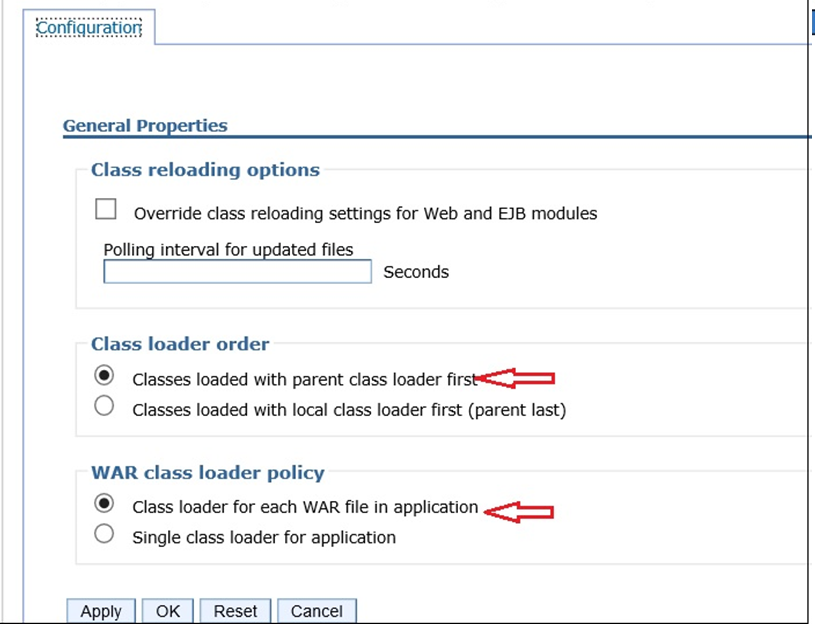
- Click the irf-t24catalog-services link. The following screen is displayed.
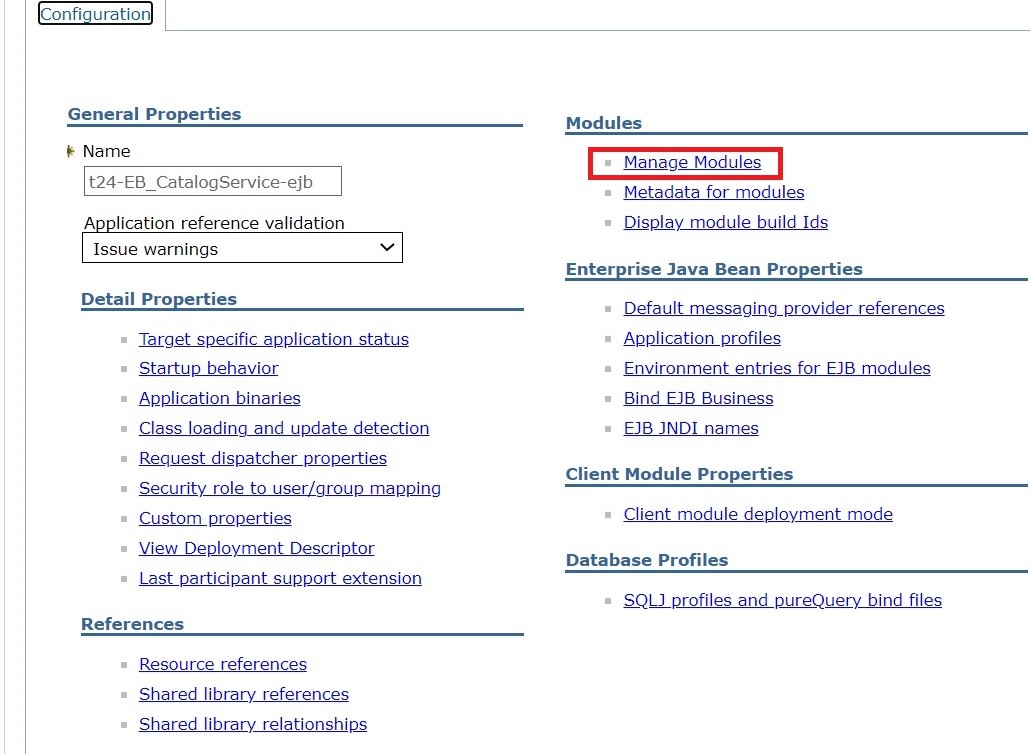
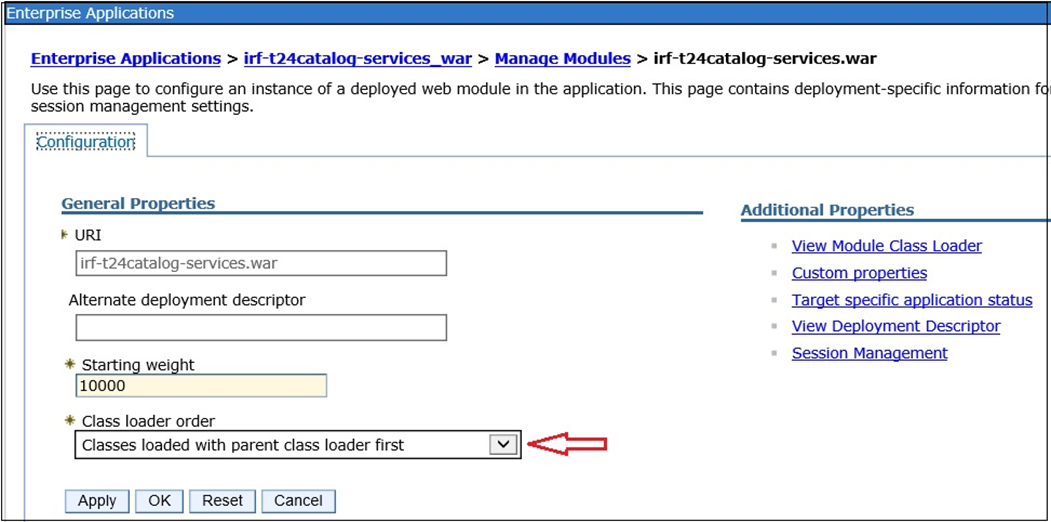
- Under Modules, click Manage Modules.
- From the Class loader order, select Classes loaded with parent class loader first and save the changes.
Installing dsf-iris.war
The below steps guide you to install dsf-iris.war.
- In the IBM console, go to Application > Application Types > WebSphere enterprise applications and click Install.
- Select dsf-iris.war and then click Next.
- Specify the Target Resource JNDI Name for the check boxes as shown in the screen and click Next.
- Enter the context root /dsf-iris and then apply the changes.
- Click Install and then save the changes.
- Click the dsf-iris link. The following screen is displayed.
- Click the Shared Library References link and then select dsf-iris.war.
- Click Reference shared libraries and select the following libraries:
- T24_Libraries
- TAFJ_Libraries
- Click the dsf-iris link. The following screen is displayed.
- Click the Shared library references link and select the Camel Web Demo check box.
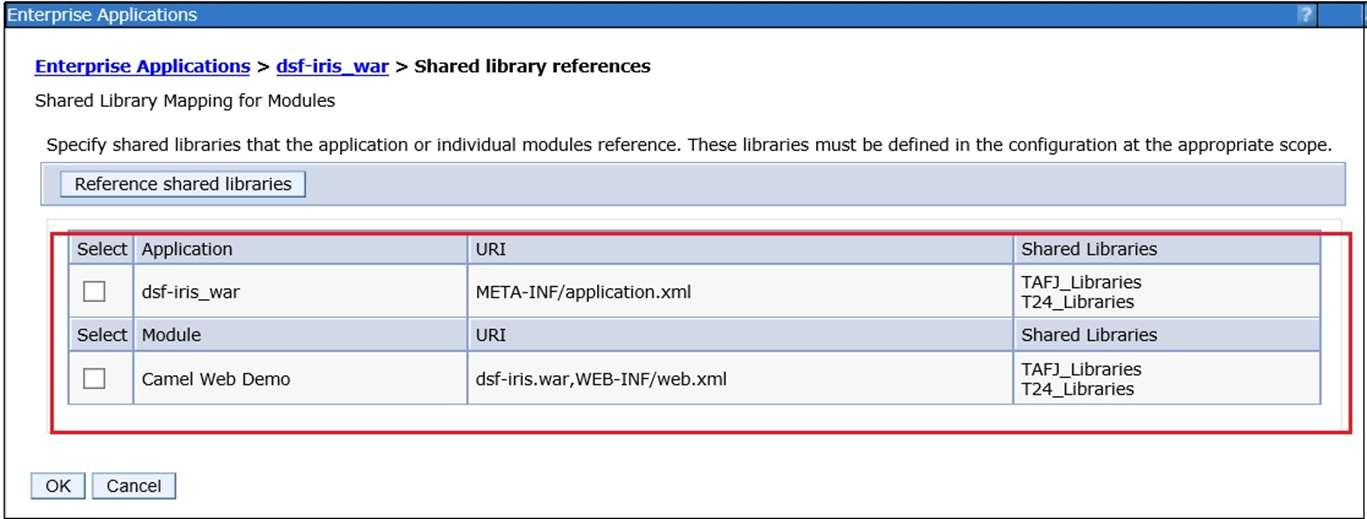
- Click Reference Shared Libraries and select the following libraries:
- T24_Libraries
- TAFJ_Libraries
- Click the dsf-iris link, the following screen is displayed.
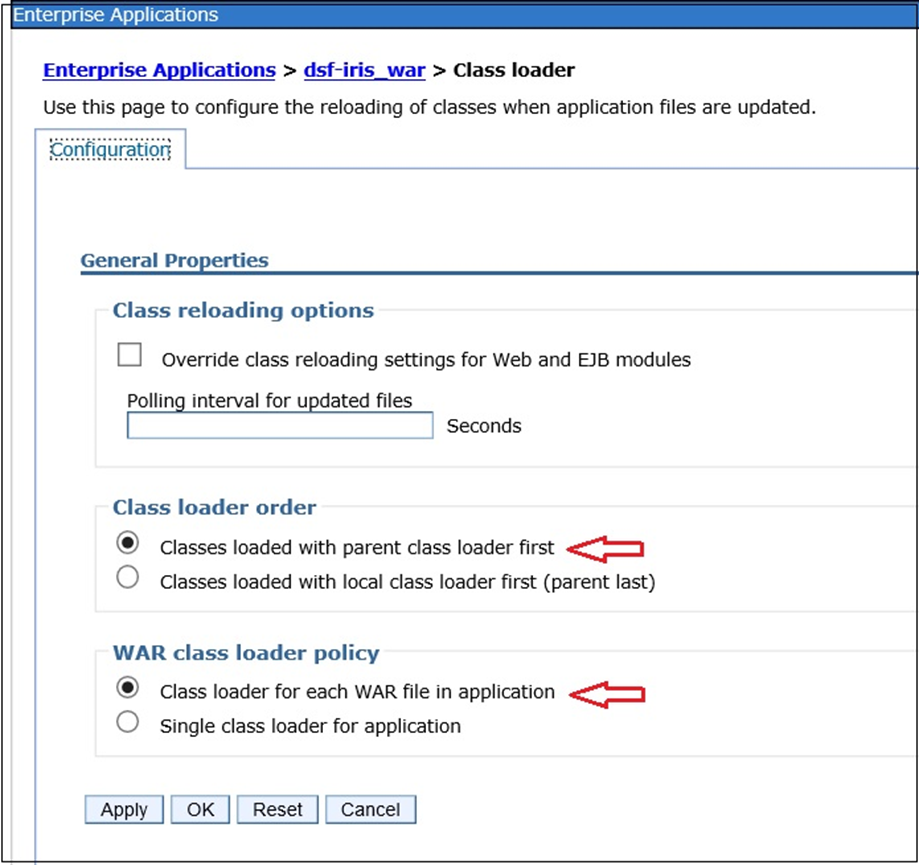
- Click Class loading and update detection to select the following options and apply the changes:
- Under Class loader order, select Classes loaded with parent class loader first
- Under WAR class loader policy, select Class loader for each WAR file in application
- Click the dsf-iris link. The following screen is displayed.
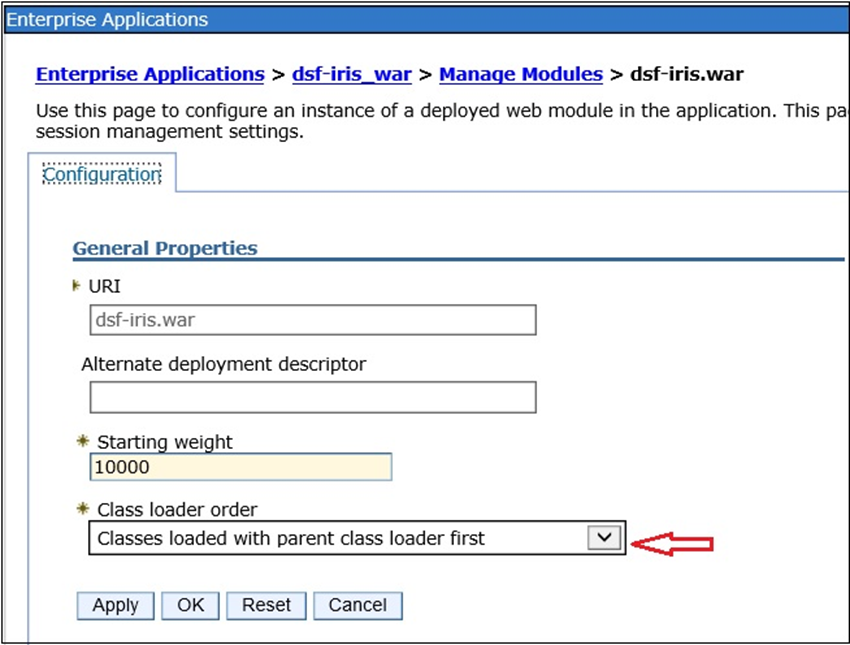
- Under Modules, click Manage Modules.
- From the Class loader order drop-down list, select Classes loaded with parent class loader first.
Installing dsf-uxp.war
The below steps guide you to install dsf-uxp.war.
- In the IBM console, go to Application > Application Types > WebSphere enterprise applications and then click install.
- Select dsf.uxp and then click Next.
- Enter the context root /dsf-uxp, apply the changes and save them.
- Click the dsf-uxp link. The following screen is displayed.
- Click the Shared Library References link and select dsf-uxp.
- Click Reference shared libraries and select the following libraries:
- T24_Libraries
- TAFJ_Libraries
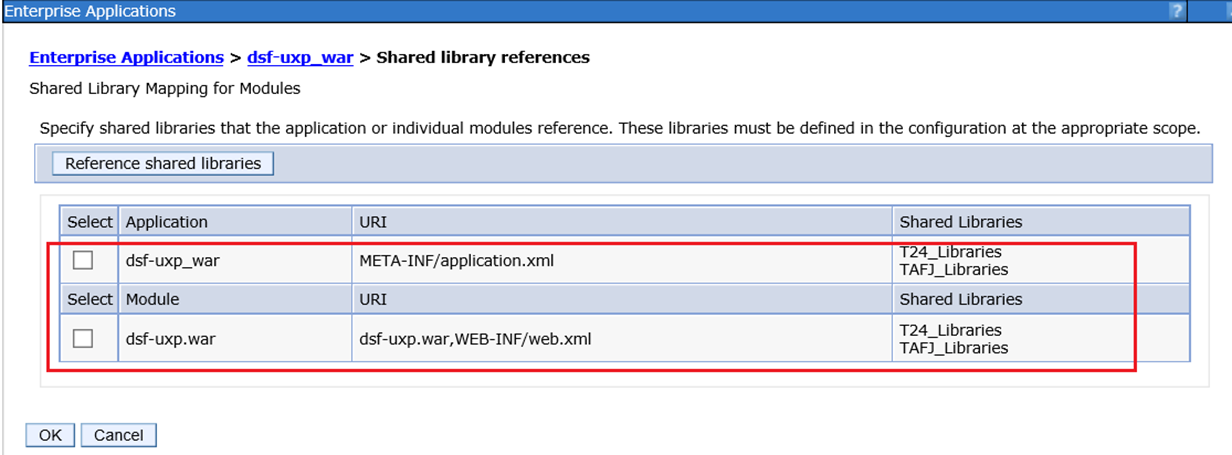
- Click the dsf-uxp link. The following screen is displayed.
- Click the Shared library references and select dsf.uxp.war.
- Click Reference shared libraries and select the following libraries:
- T24_Libraries
- TAFJ_Libraries
- Click the dsf-uxp link, the following screen is displayed.
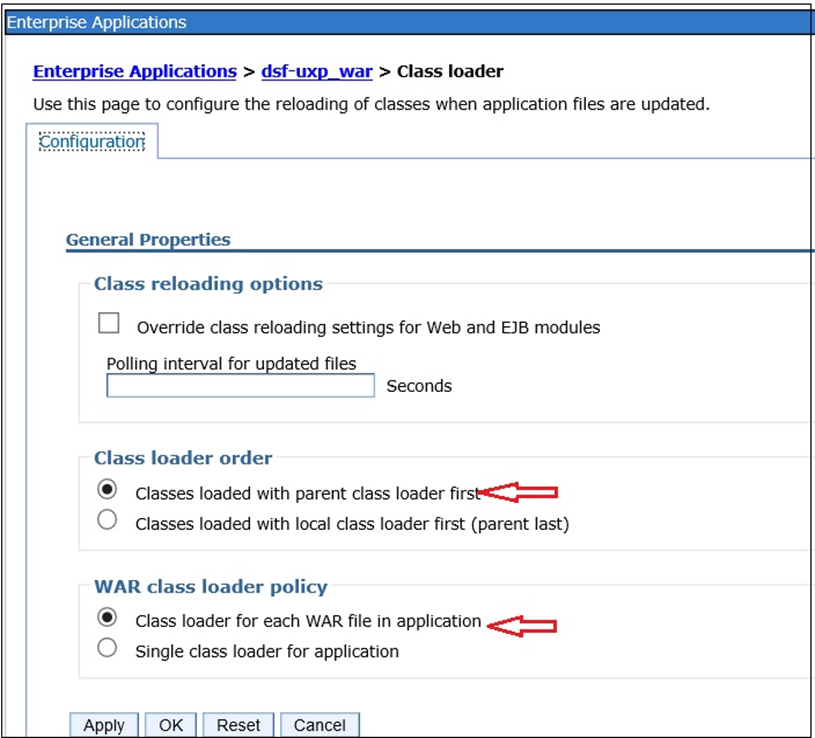
- Click Class loading and update detection and select the following options:
- Under Class loader order, select Classes loaded with parent class loader first
- Under WAR class loader policy, select Class loader for each WAR file in application
- Click the dsf-uxp link. The following screen is displayed.
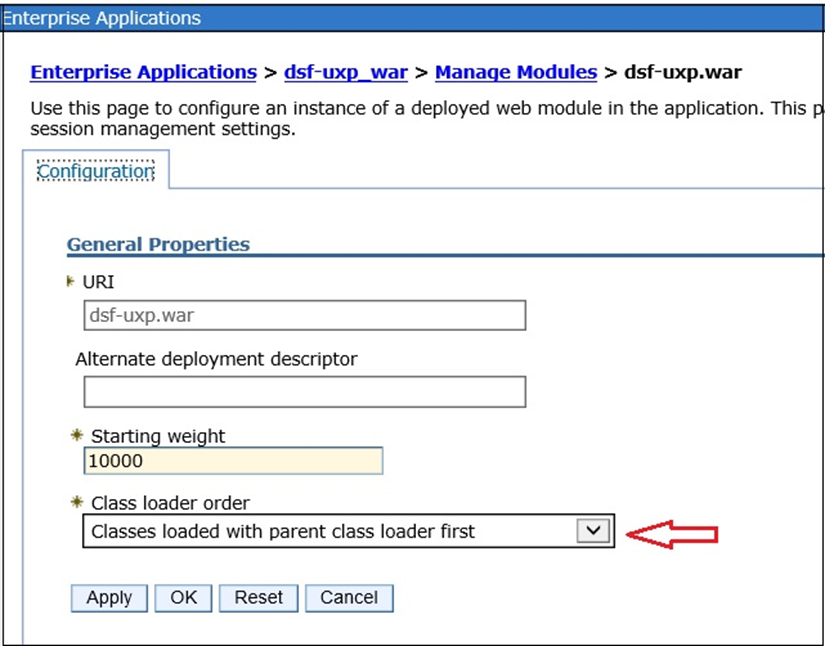
- Under Modules, click Manage Modules.
- From the Class loader order drop-down list, select Classes loaded with parent class loader first and then apply the changes.
Defining a New Connection Factory
A connection factory is used to create connections to the associated JMS provider. The below steps guide you to define a new connection factory.
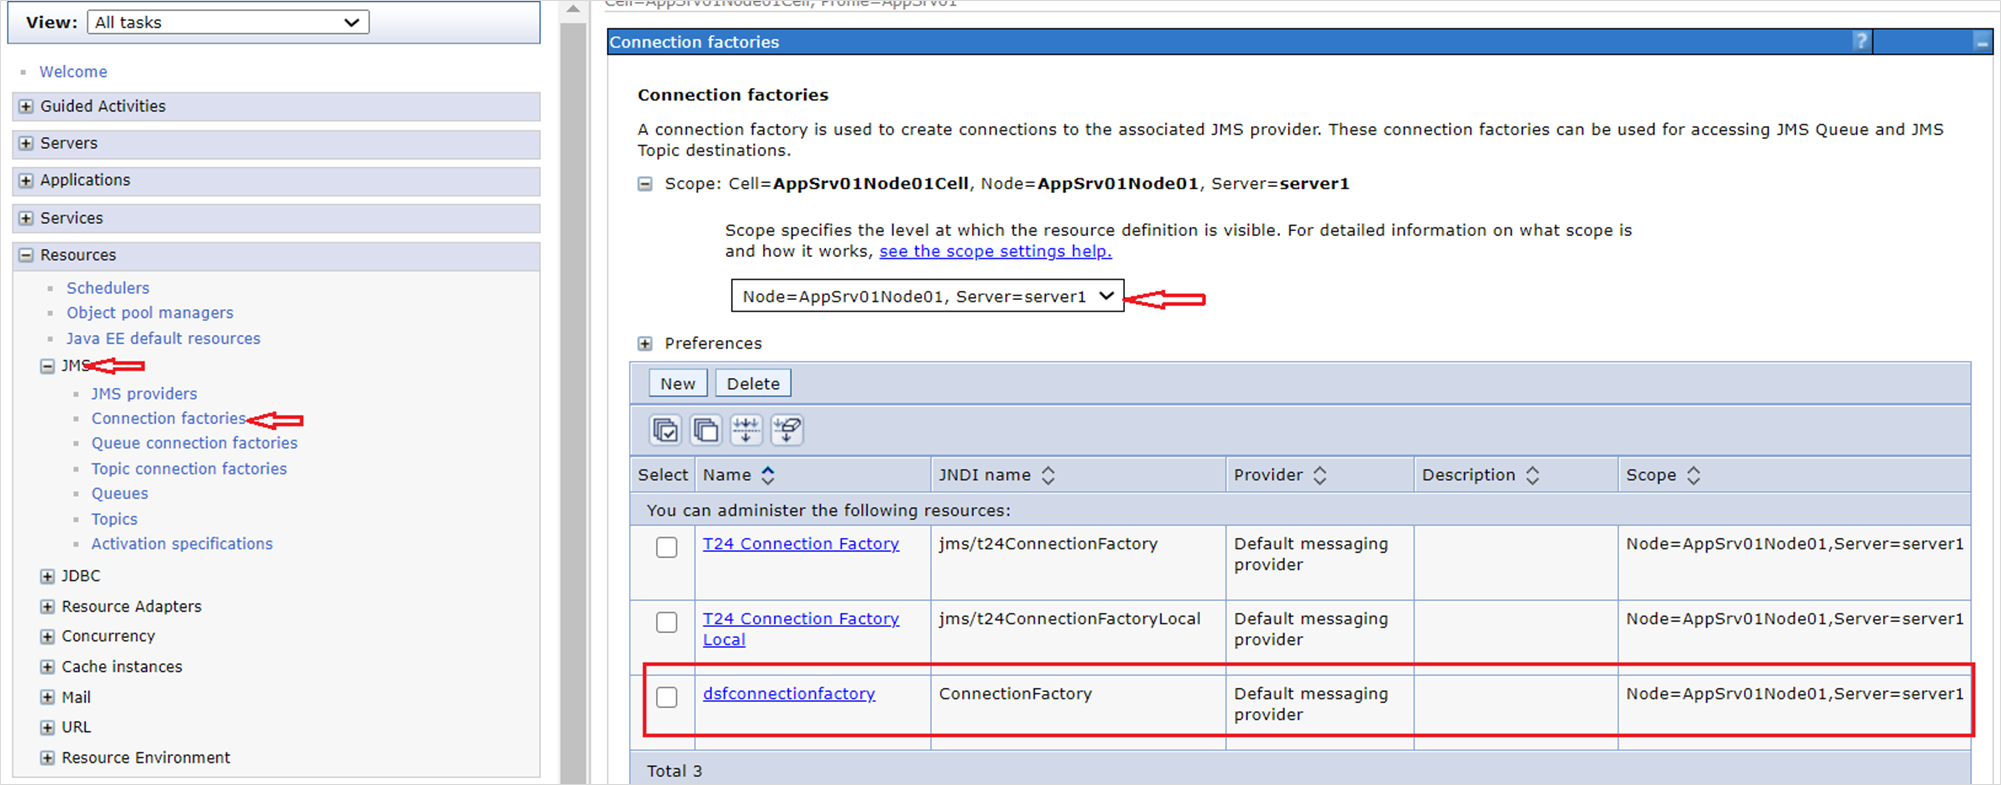
- In the IBM console, go to Resources > JMS > Connection Factories.
.png)
- In the right pane, select Node=AppSrv01Node01, Server= server1 from the drop-down list.
- Click New. The following screen is displayed.
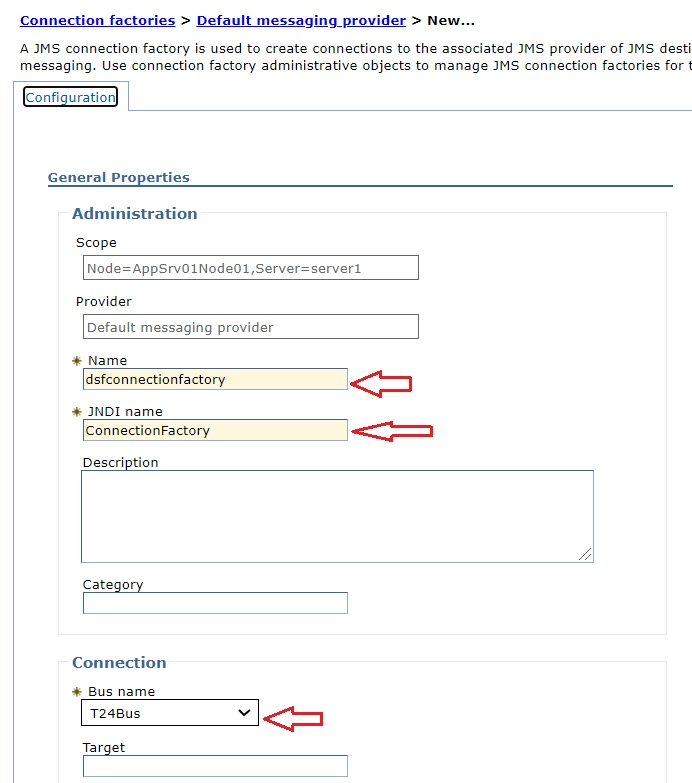
- Enter the following and save.
- Name: dsfconnectionfactory
- JNDI Name: ConnectionFactory
- Bus Name: T24 Bus
A new Connection Factory is added as shown in the figure:
- Restart the server.
You must wait till the following message is displayed in the
dsf-iris.log.
.. t24-dsf-bootstrap-post.jar SUCCESSFULLY deployed
Launching the URL
Under Virtual hosts, if dsf-uxp.war is set to default_host, then you must verify the port number to launch dsf-uxp.war. The below steps guide you to launch the URL.
- Go to Environment > Virtual hosts > default_host.
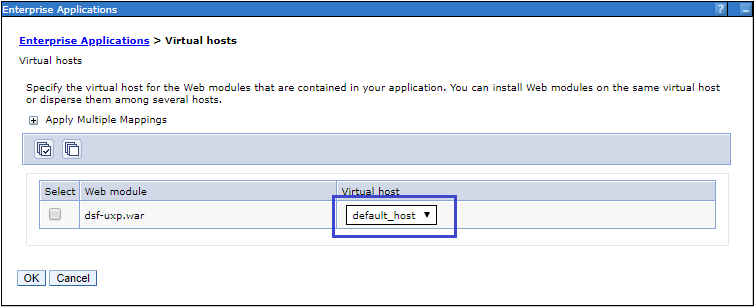
- Choose Host Aliases from additional properties and verify the port number.
- Launch the URL. The URL should be in the following format:
http://<ip-address>:<port-number>/<context-root>
http://10.11.12.13:9080/dsf-uxp/
In this topic