Received Guarantees and Standby LC - Claims Initiated
The Web Channel user with access to Trade Finance has capabilities to view the Guarantees and Stand by LC Claims received dashboard. The dashboard displays the list of claims received. If no claims are available, the system throws an appropriate message to the user. Do any of the following in the Guarantees and standby LC claims received section.
- View/Filter the list of Guarantees or Standby LC Received.
- Search for a particular Guarantee and Standby LC and view details.
- Claim Initiation of Received Guarantees and Standby LC for Payment/Extension.
- Upload Documents for claim support.
- Submit a claim initiated for approval.
- Download the list of available claims Initiated.
- Download or print individual claims received.
- Presentation for SBLC Received.
- Upload Documents for Claim Support.
- View/Print/Download the Presentation initiated for received SBLC.
- View the rejection message for initiated Presentation for SBLC.
- View the Status of Claim/Presentation Record after each actions executed.
- Dashboard configuration for Claim Received.
Navigation path: Web Channel > Side Menu > Trade Finance > Received Issued Guarantees & Standby LC > Claims Initiated.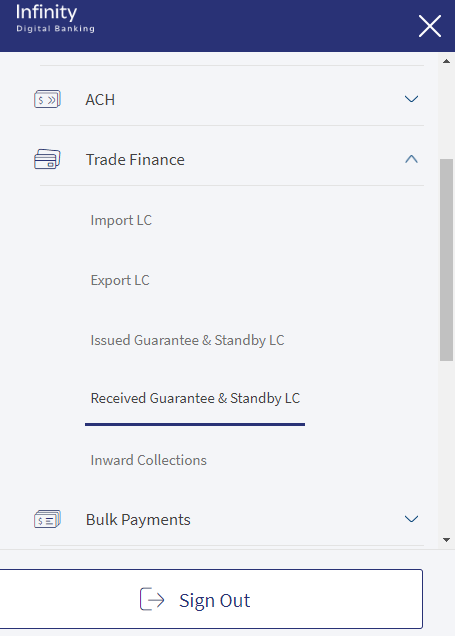
UX Overview
Claims Overview
The overview section displays the summary of all the claims initiated by the user. Certain classifications include the status of the claims and product type. Following are things the user understands from the Overview section.
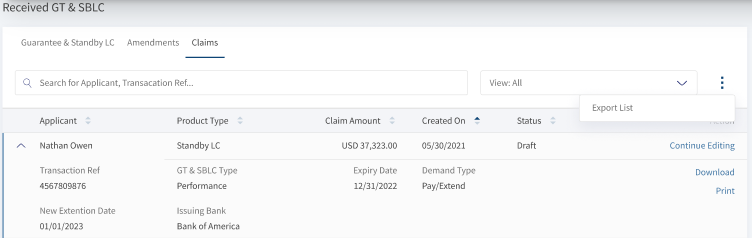
- Search: Use the keywords like Applicant or Transaction Referenceto search for the records.
- Filtering: Use the values displayed in the filter to narrow down the search.
 Filtering Options:
- Product Type
- Guarantee
- Standby LC
- Guarantee and SBLC Type
- Performance: To secure the applicants satisfactory fulfillment of its contractual performance obligations.
- Bid: This supports the issuers bid for a contract.
- Advance: To ensure the repayment of an advance payment made earlier for the contract.
- Shipping: To ensure the damages repayment for during the products shipping.
- Status
- Draft: The record is work in progress and not submitted to bank.
- Submitted to Bank: The record is submitted to the bank.
- Processing with Bank: The record is processing with the bank.
- Returned by Bank: The record is returned back to the user with some appropriate comments. The bank user needs to verify and re-submit the claim.
- Rejected: The record is rejected by the bank.
- Claim Honoured: The claim is successfully and payment is also completed.
- Time Period
- Today: Considers the records created on the same day.
- Last One Month: Considers the records created from the last 30 days.
- Last Six Months: Considers the records created from the last 180 days.
- Last One Year: Considers the records created from the last 365 days.
- YTD: Considers the records created from start day of the calendar year.
- Product Type
- Applicant: Specifies the name of the beneficiary.
- Product Type: Specifies the type of record Guarantee or Standby LC.
- Claim Account: The value of current claim.
- Status: Current status of the record.
- Actions: Available actions for the user. View Details as per the record level and Print and Download when record is expanded.
Claims - Record Expanded
The claims initiated- record expanded displays the additional details for the particular record.

- Transaction Reference: Specifies the transaction reference number.
- GT & SBLC Type: Specifies the type of Guarantee or SBLC type.Click here to find information on GT & SBLC types.
- Performance: To secure the applicants satisfactory fulfillment of its contractual performance obligations.
- Bid: This supports the issuers bid for a contract.
- Advance: To ensure the repayment of an advance payment made earlier for the contract.
- Shipping: To ensure the damages repayment for during the products shipping.
- Expiry Date: Specifies the expiry date of the claim.
- Demand Type: Specifies the demand type of claim.
- Issuing Bank: Specifies the name of the Issuing bank.
- Download and Print options help the user to download or print the LC.
Download and Print options help the user to download or print the LC.
Guarantee and Standby LC - Issuance Details
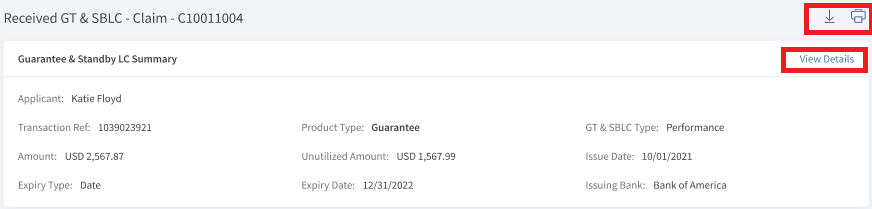
The Issuance Details page summarizes the Guarantee and Standby LC page. The user can perform any of the following actions:
- View the Claims Details.
- Print and Download the current claim.
- Go back to the claims dashboard.
-
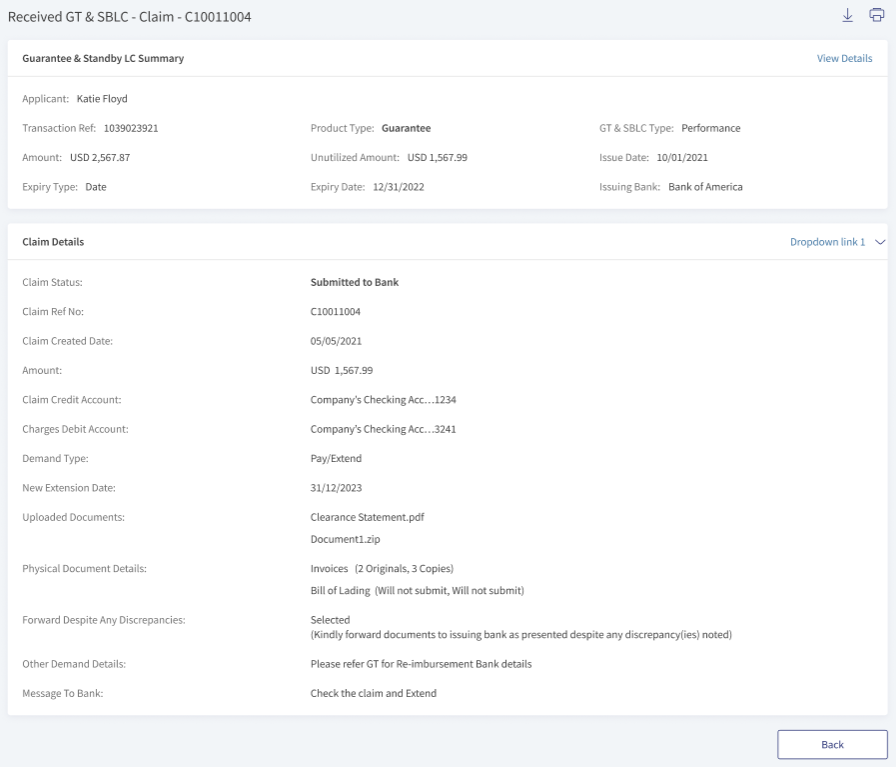
Guarantee & Standby LC Summary

- Beneficiary: Specifies the name of the beneficiary.
- Product Type: Specifies the type of product Guarantee or Standby LC.
- GT & SBLC type: The type of the GT & SBLC. Performance, Bid, Advance, or Shipping.
- Amount: The total value of the GT & SBLC.
- Unutilized Amount: The total money which is available as per LC value.
- Issue Date: The date of GT & SBLC issuance.
- Expiry Type: The type of expiry. Open ended, date, or conditions.
- Issuing Bank: The name of the bank Issuing the LC.
-
Claim Details
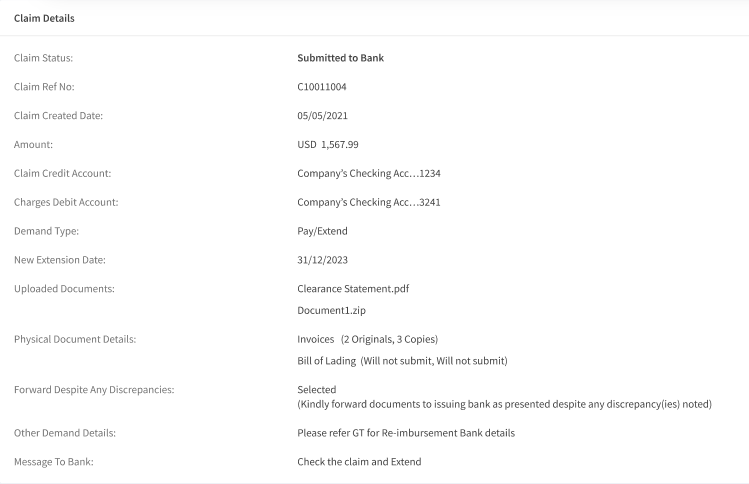
- Claim Status: The current status of the claim.
- Claim Reference Number: The unique reference number for the claim.
- Claim Created Date: The date on which the claim is created by user.
- Amount: The total value of the claim.
- Claim Credit Account: The account details on which the claim amount credits.
- Charges Debit Account: The charges for the current claim debiting account details.
- Demand Type: The type of demand. For example, Pay/ Extend.
- New Extension date: The new date to complete the settlement.
- Uploaded Documents: The List of documents attached for the current claim.
- Physical Document Details: The details of physical documents submitted to the bank.
- Forward Despite Any Discrepancies: Select the list from the drop down list.
- Other Demand Details: Specifies the additional details for the current claim.
- Message from Bank: This specifies the messages sent by bank for the current claim.
-
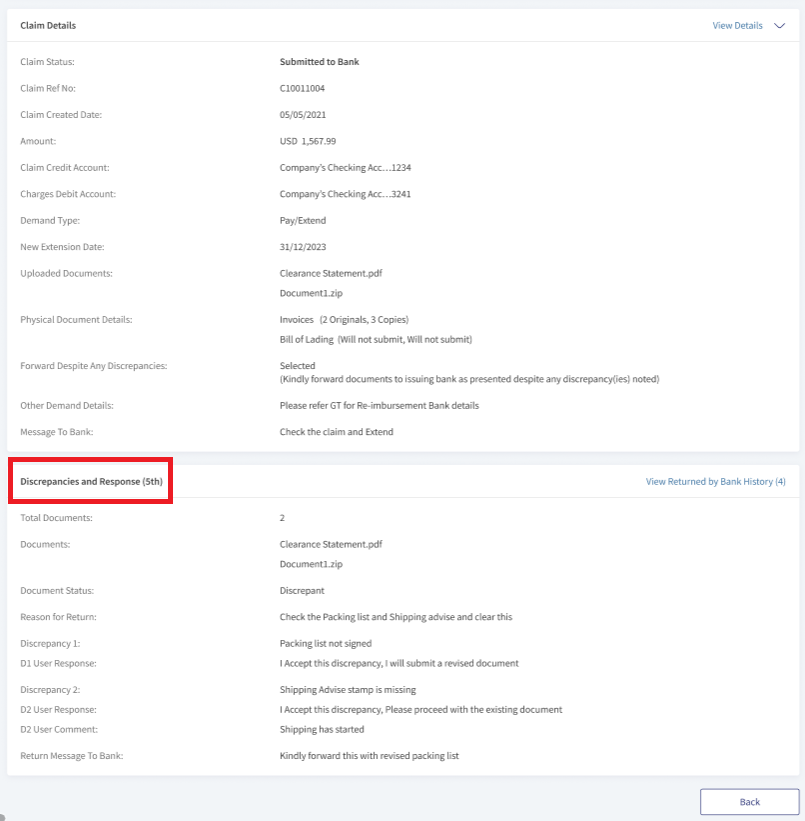
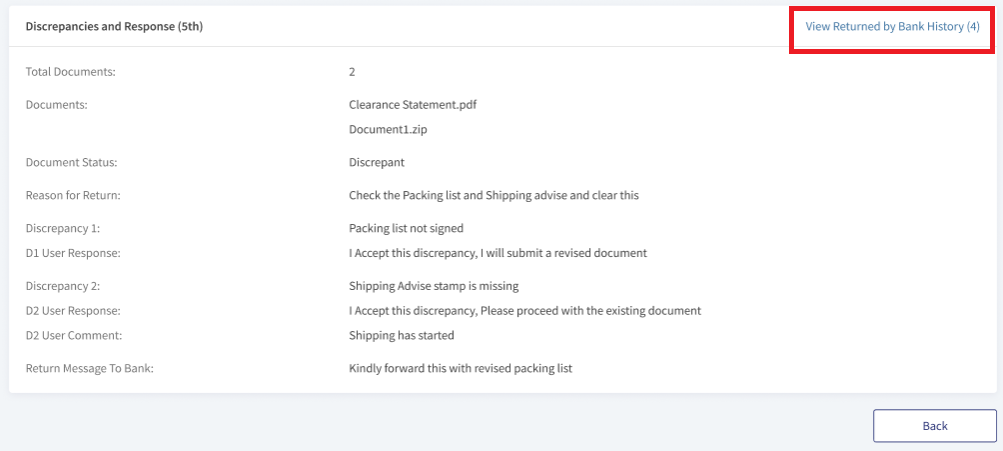
Discrepancies and Response
- Total Document: The total number of documents attached to the claim.
- Documents: The document names attached to the claim.
- Document Status: The current status of the document.
- Reason for Return: The bank user reasons for returning the record.
- Discrepancy: Specifies the details of the discrepancy.
- User Response: The bank user response to the discrepancy.
- User Comments: The bank user additional comments.
- Return message to the bank: The returning summary message to the bank.
-
Payment Details
The field of this sections varies as per the payment status.
-
Payment Status: Rejected
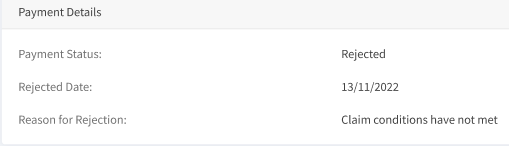
- Rejected Date: The date of claim rejection.
- Reason For Rejection: The bank specifies the reason for rejection.
-
Payment Status: Awaiting for Payment
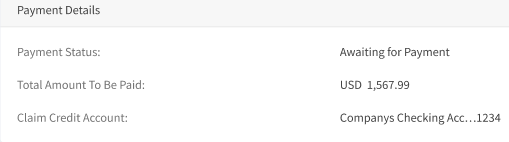
- Total Amount to be Paid: Specifies the total amount to be paid for the current claim.
- Claim Credit Account: The claim amount crediting account details.
-
Payment Status: Settled
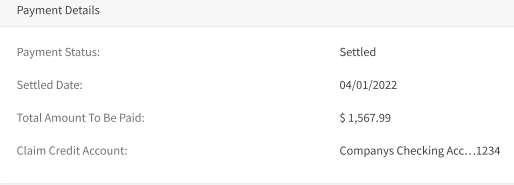
- Settled Date: The date of claim payment cleared.
- Total Amount to be Paid: Specifies the total amount to be paid for the current claim.
- Claim Credit Account: The claim amount crediting account details.
-
Search for a Individual Claim
In the Search bar use any of Applicant, Guarantee or Standby LC, Product Type, or Transaction Reference and for further filter options to narrow the Individual Claim.

View Claim Details
The bank user with required permissions can view the details of the claim received. The user can see details for a particular claim or can see all the claims initiated for a particular Guarantee.
View a Particular Claim Initiated
The following are the steps to see particular Claim details.
- In the Search bar use any of Applicant, Guarantee or Standby LC, Product Type, or Transaction Reference to narrow down the results.
- On the desired Claim record, click View Details. This will navigate to Claims page viewing the details.

View All Claims Initiated for a Guarantee and Standby LC.
The following are the steps to see all Claim Initiated for particular Guarantee and Standby LC.
- In Received Guarantees and Standby LC dashboard, search or filter for the record and click View Details. This navigates to detailed view page.
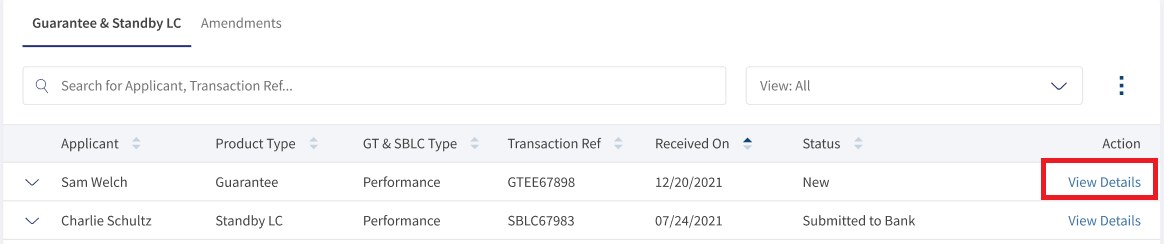
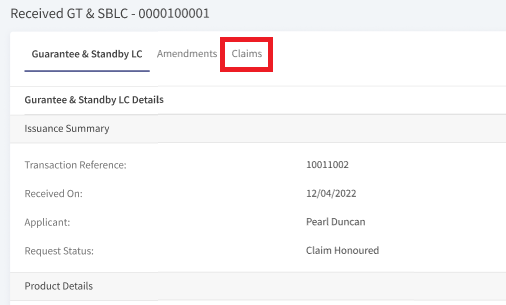
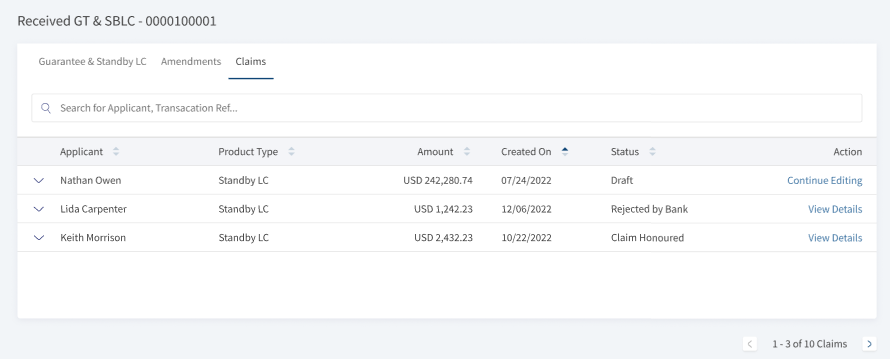
- Click Claims at the top the page. This navigates to the page with all available claims for the particular Guarantee.
View Claims Initiated - Submitted to Bank
The user with required permissions can view the claims initiated records. The detailed view page of claims initiated with status Submitted to Bank have Summary, Claim Details and Discrepancies and Response sections are available.
The section Discrepancies and Response is only viewable if the Claim Initiated record have any history of discrepancies. The user can click View Returned by Bank History to see the history for the record.
View Claims Initiated - Payment Advice
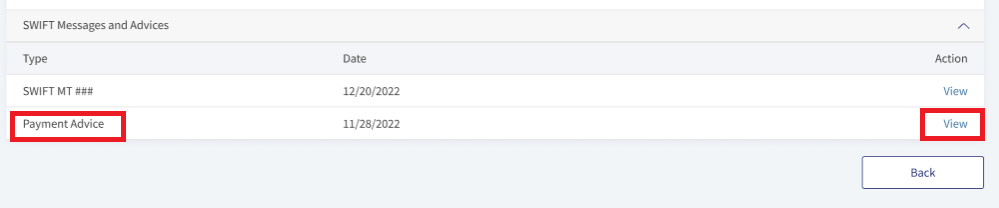
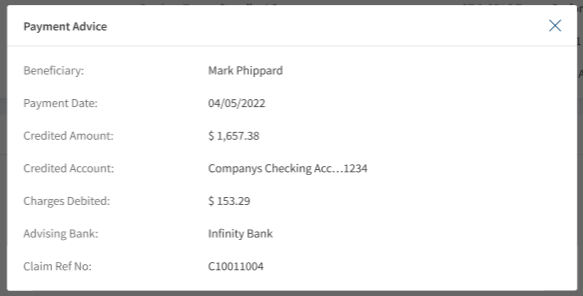
The bank user with required permission can view Payment Advice for the records with Claim Status - Claim Honoured. The following are the steps to view Payment Advice.
- In the Claims Initiated Dashboard, filter the record with status - Claim Honoured. On the desired record, Click View Details. This navigates to the Received GT and SBLC details page.
- In SWIFT Messages and Advices, click View against the Payment Advice.
- A pop-up box is displayed with the Payment Advice details.
View Claims Initiated - Returned by Bank
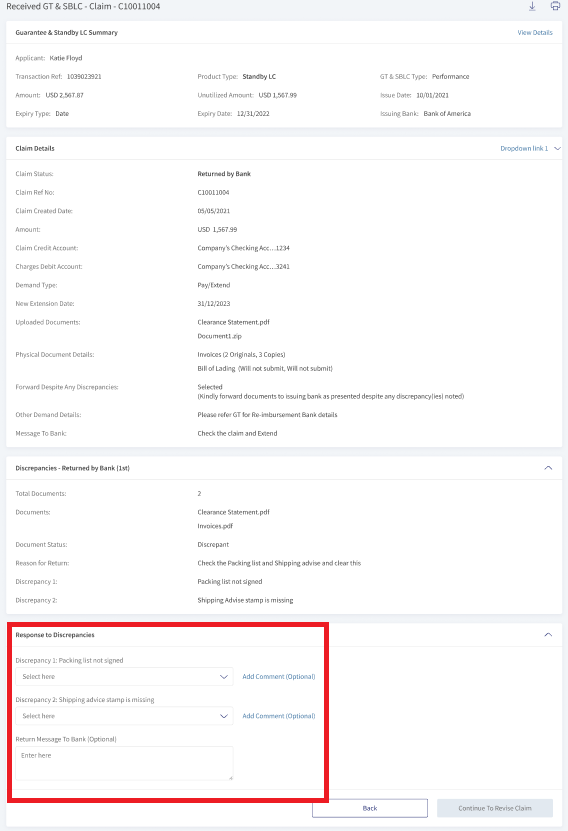
The bank user with required permission can view and respond to the Claims Initiated with the status - Return by Bank. The following is the procedure to view and respond the records with status - Returned by Bank.
- In the Claims Initiated Dashboard, filter the record with status - Return by Bank. On the desired record, Click View Details. This navigates to the Received GT and SBLC details page.
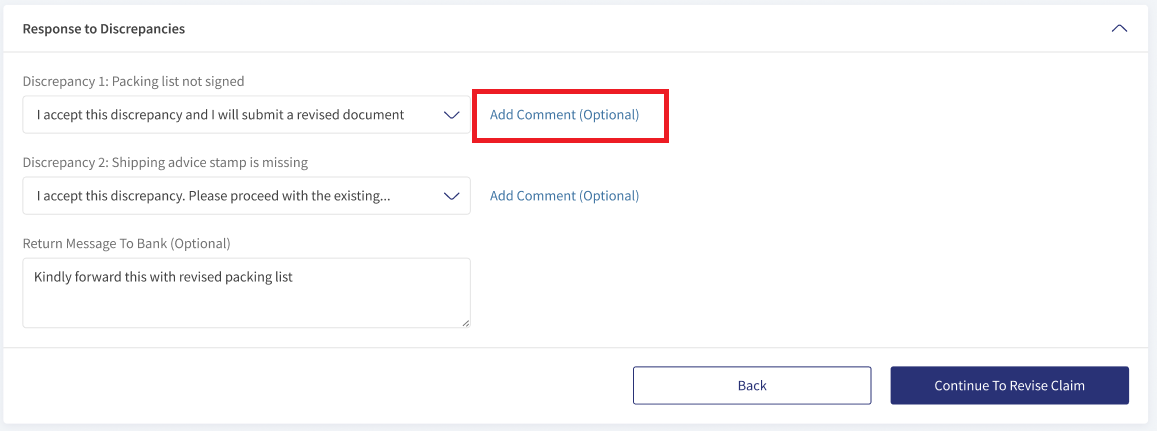
- In Response to Discrepancies section, select the responses from the drop-down list.
- The user can select Add Comment to add comments for the respective discrepancy. This is an optional field.
- The user can delete the comment by clicking the Remove Content.
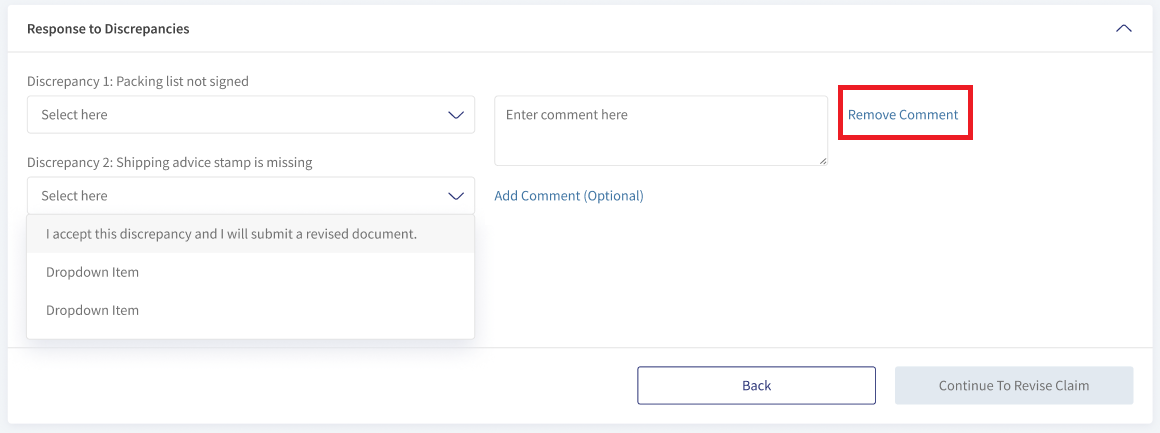
- The user can select Add Comment to add comments for the respective discrepancy. This is an optional field.
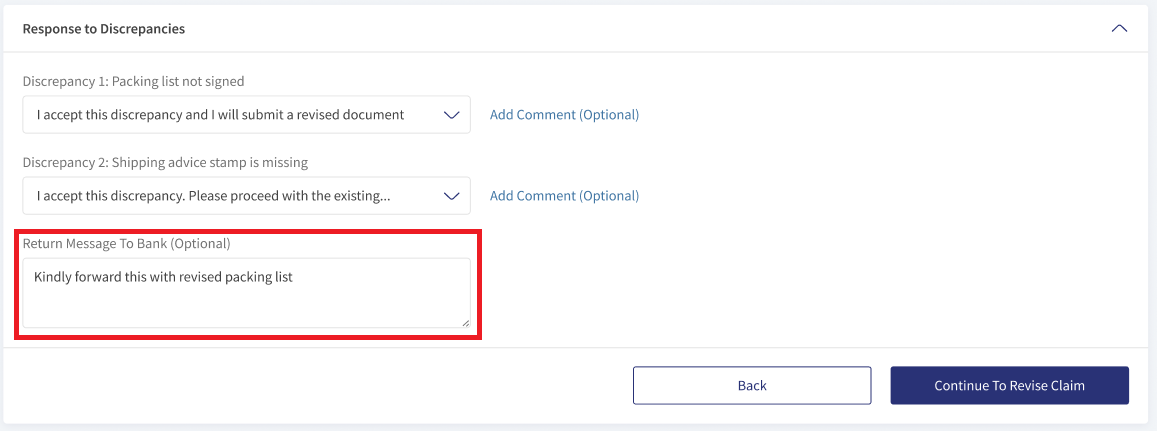
- Enter the Return Message to Bank (This is an optional field).
- Click Continue To Revise Claim. This navigates to Claim Revise page.
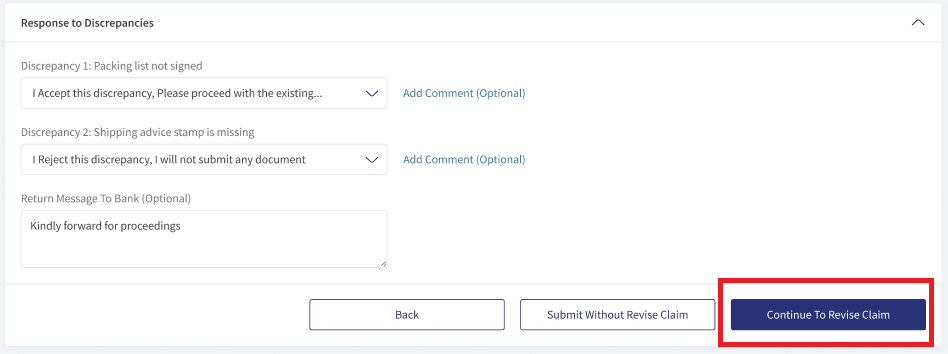
- Revise the content and if user need to see other Claims Fields to Revise toggle the bar.
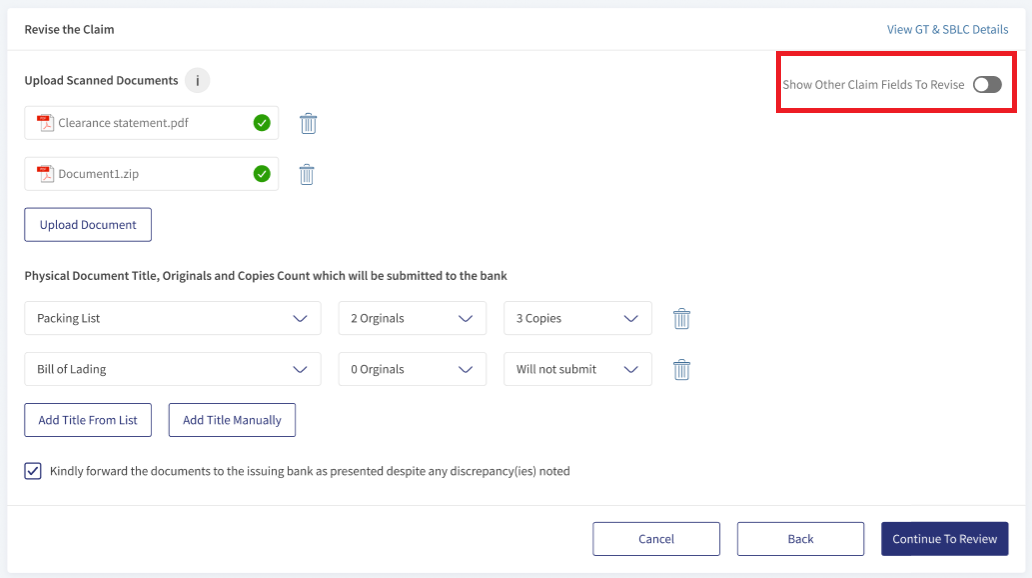
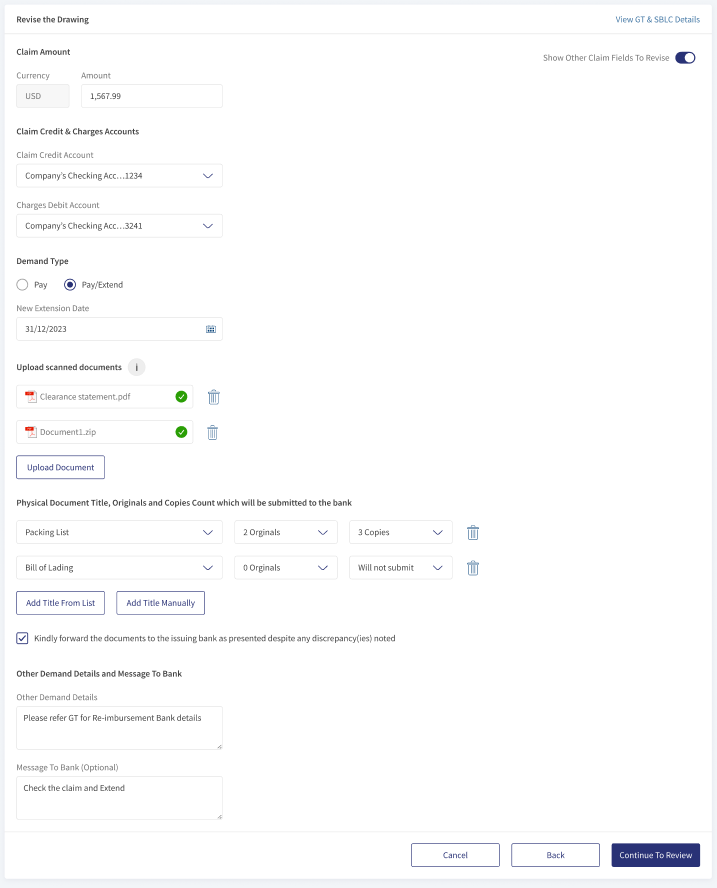
- Click Continue to Review. This navigate to Review and Submit page.
- Review the details and click Submit. This navigates to Acknowledgment page.
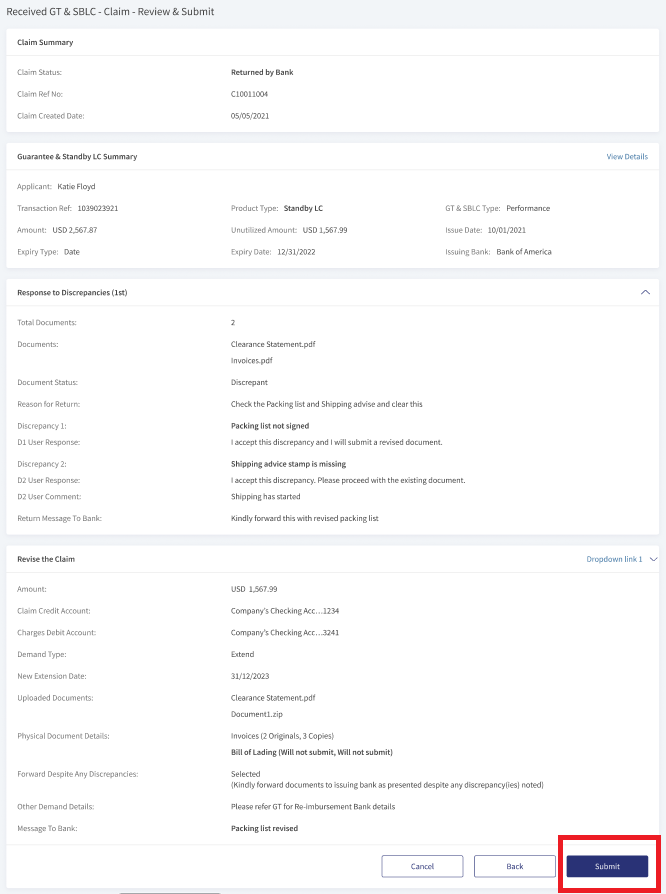
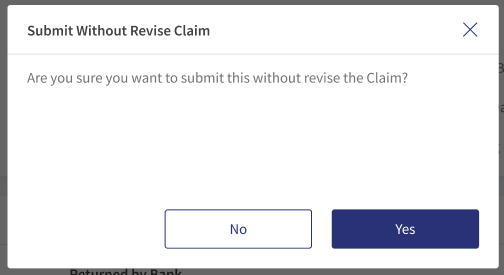
- If user submits the records without any changes to the current claim, a pop-up box displayed for confirmation. Click Yes. This submits the claim.
- If user submits the records without any changes to the current claim, a pop-up box displayed for confirmation. Click Yes. This submits the claim.
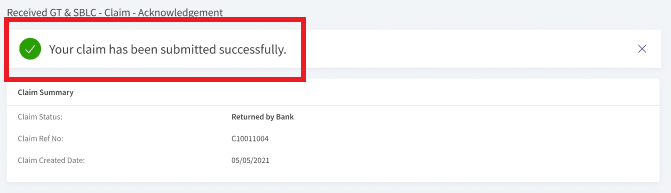
- A success message appears at the top of the page.
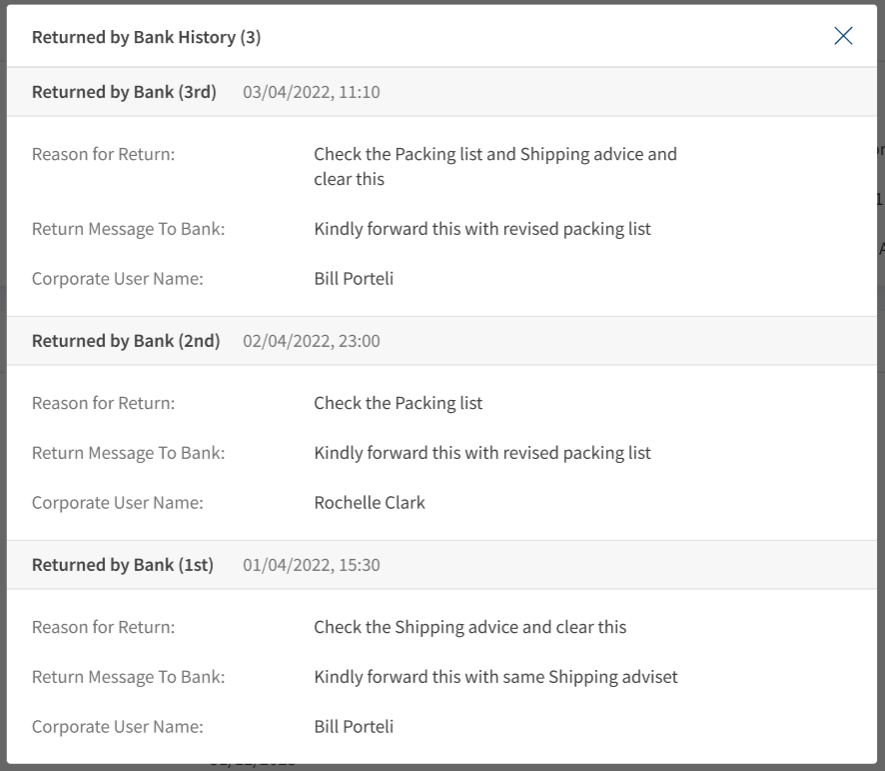
View history - Returned By Bank Record
The bank user can also see the history of the record. In the Discrepancy section, click View History. This displays pop-up box displays all return by bank history records for a particular claim initiated.
Create a New Claim
The Claim has to created using for a Guarantee or Standby LC record. The bank user with required permission can create a new claim from the Received Guarantee and Standby LC dashboard. Following are the steps to create a new claim.
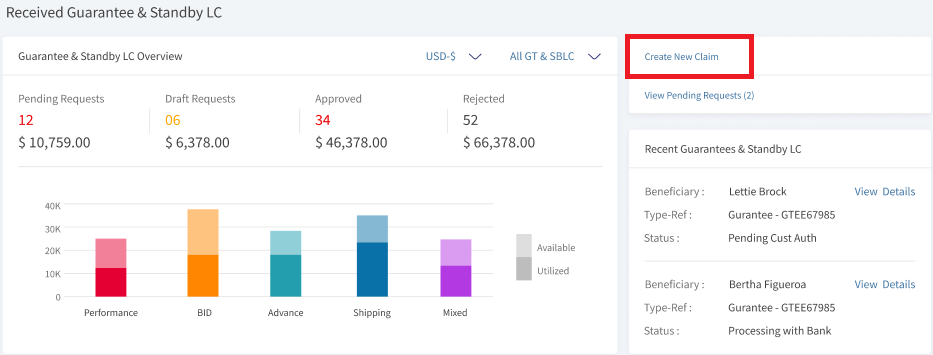
- In the Guarantee and Standby LC dashboard, Click Create New Claim in the quick links section.
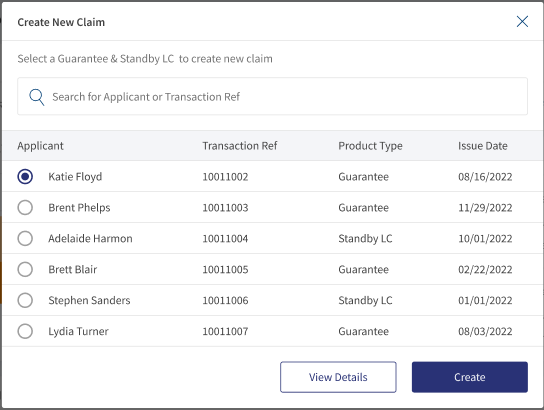
- In the pop-up, select the LC for the claim to be created. This navigated to Received Guarantee and Standby LC details.
- Verify the details, select the button Create New Claim. This navigates to create new claim page.
- In Guarantee and Standby LC summary, review the details.

- In Create New Claim,
- Enter the Amount.
- Select the Claim Credit and Charges Account from the drop-down list.
- Select Charges Debit Account from the drop-down list.
- Select the Demand Type. Either Pay or Pay/Extend.
- If user select Pay/Extend, select the New Extension Date.
- Upload the supporting Scanned Document for the claim.
- Click Upload Document to upload the document from the system.
- In the pop-up window, navigate the file that to be uploaded.
- Select the file and click Upload. This uploads the file to the claim.
- Enter the Physical Document Titles.
- Use Add Title From List to add new row with drop-down list to select the predefined title.
- Use Add Title Manually to add new row with text field to type new title. Use this when the drop-down list does not have the desired title name.
- Enter the Other Demand Details and Message to Bank. This is mandatory field.
- Enter the Message to Bank. This is an optional field.
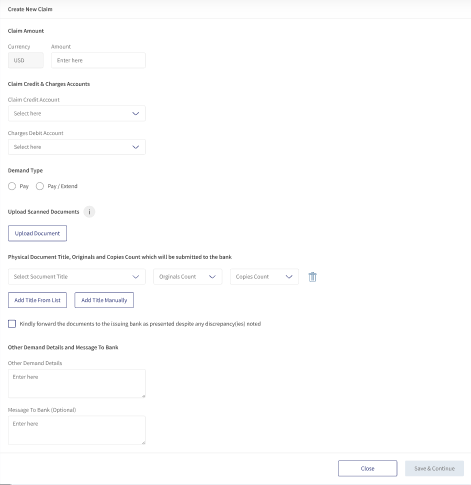
- Click Save and Continue. This navigates to Review and Submit page.
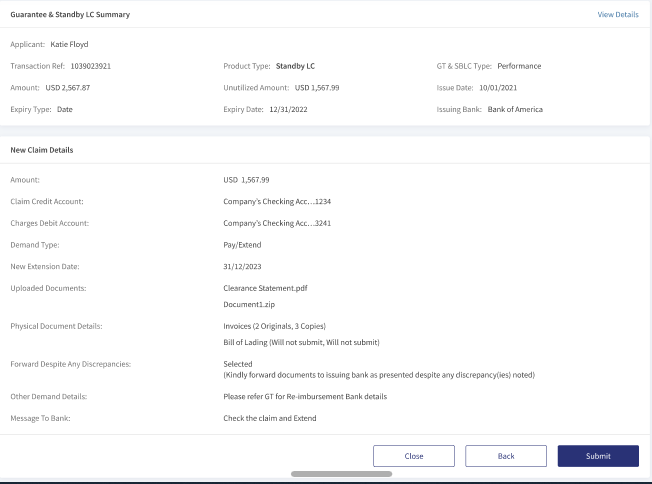
- Review the Details, click Submit to create a new claim.
Use the buttons Back to go back to previous page. Use the button Close, to save the record as draft or delete the claim with submitting. The user will have these two options in the pop-up window.
Download or Print Claims
The user has two options to download Claim records. Either they can download the complete list displayed on the LC dashboard page and download or print individual LCs.
Download Claims list
The following are the steps to download Claims list into excel (.xlsx).
- Click the Ellipses.
- Select the option Export List. This downloads the list of Claims records into an excel file.

There are two ways to download or print Claim. The first way is to expand the individual record(click the arrow) to see the action items Download and Print at the right of the record and second way is to download the LC from the view details page.
Download or Print individual Claims - from Claims Dashboard:
- Click the arrow to see the summary of the Claims record.

- Click Download or Print to download or print Claim.
The download options downloads LC in a PDF format. The print option opens a print dialogue box for printing the Claim Details.
Download or Print individual Claim - from LC Details page.
- Click View Details of the individual LC.
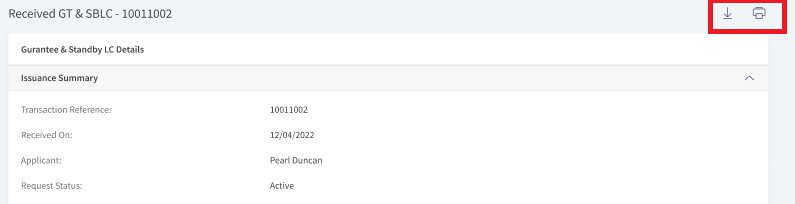
- Click Download or Print icon at the top right of the page to download or print LC details.
SWIFT MT 700
SWIFT is an acronym for Society for Worldwide Interbank Financial Telecommunication. SWIFT provides a secure, highly encrypted, and reliable messaging service to all financial institutions.
This is an additional feature provided to the Trade Finance Micro App to implement the SWIFT MT700 codes to the fields available in LCs. If there is no SWIFT code, then NA will display adjacent to the field. The same SWIFT MT700 codes will also display in the download and print LCs.
Enable the Spotlight configurations to display the SWIFT tags. Individual configurations are available for Web Channel, download, and print LCs.
Web Channel SWIFT MT700 codes: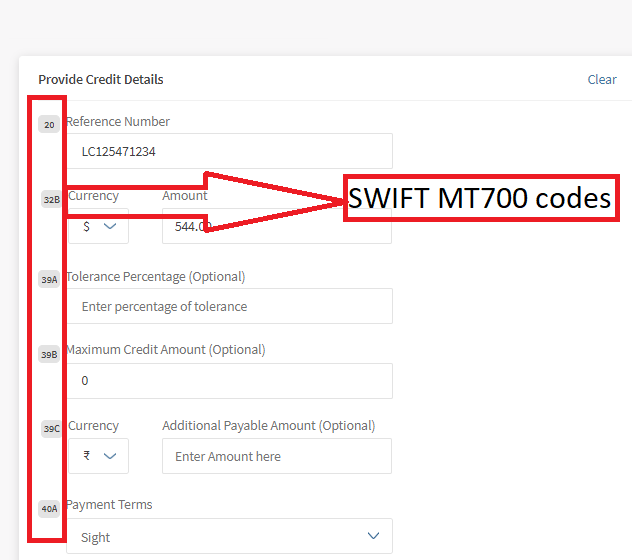
Download and Print SWIFT MT700 codes: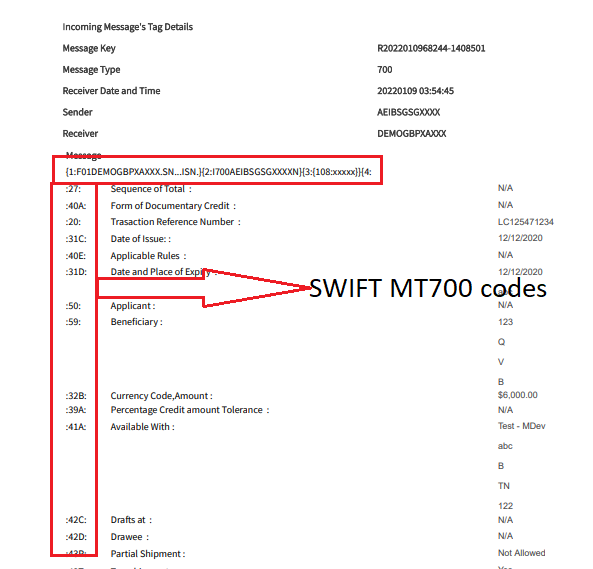
Swift and Advices
The bank user with required permissions can see the Swift MT messages and Payment Advices for a particular record. The following is the procedure to view Swift and Advices for a particular record.
- In the dashboard, search or filter for the record.
- Click View Details on the record to view Swift and Advices. The navigates to the detailed page view.
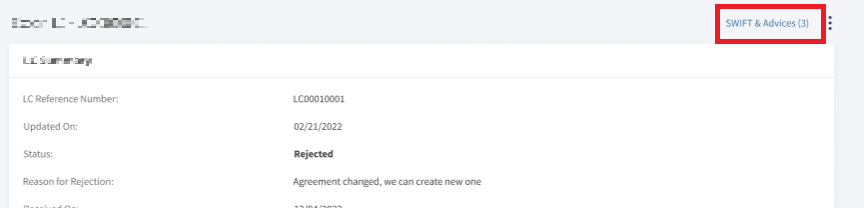
- Click SWIFT & Advices.
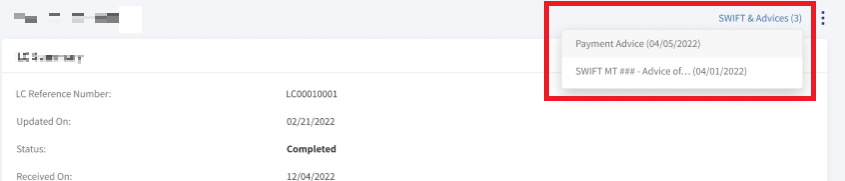
- In the pop-up,
- Select Payment Advices to view payment advices for a particular record.
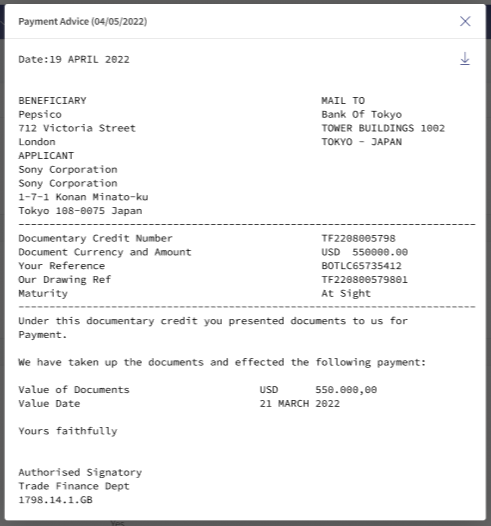
- Select SWIFT MT to view in advices in SWIFT MT mode.
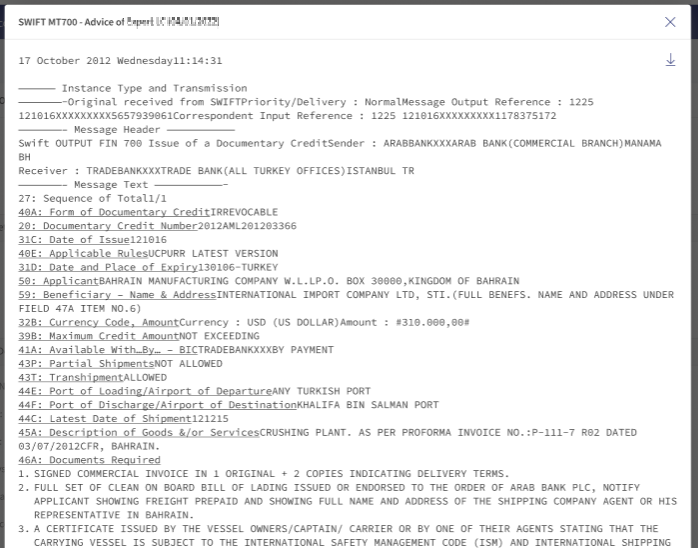
- Select Payment Advices to view payment advices for a particular record.
SRMS Configuration
The SRMS configurations are shipped as a part of this feature. For more information, see SRMS Configurations.
Experience API
The following are the APIs for Guarantees and Standby LC.
| Name | Description | Introduced In |
|---|---|---|
| CreateGuaranteeClaims | This API creates Issued Guarantee Claims. | 2022.10 |
| SaveGuaranteeClaims | To API saves the Issued Guarantee Claims as draft. | 2022.10 |
| GetGuaranteeClaims | This API retrieves Issued Guarantee Claims for particular customer. | 2022.10 |
| getGuaranteeAmendmentById | This API retrieves issued guarantee claims by Id. | 2022.10 |
| UpdateReceivedGuaranteeClaim | This API updates issued guarantee claims. | 2022.10 |
| generateReceivedGuaranteeClaim | To API downloads report for issued guarantee claims record. | 2022.10 |
| generateClaimsList | This API exports list of Issued guarantee claims. | 2022.10 |
| UpdateReceivedGuaranteeClaimByBank | This API is a mock service to update the Issued Guarantee Claims from bank. | 2022.10 |
| Object Data Model | This Object Data Model describes the parameter name and other attribute details for Trade Finance. |
In this topic