Profile Settings
Use the feature to manage various settings of your profile.
Menu path:
- Web channel: Click Profile Picture to navigate to profile settings page. Alternatively, click side menu > select Settings to navigate to profile settings. On the Settings screen, click to expand Profile Settings. By default, the app displays the Personal Details section.
- Mobile Native: From the bottom menu, tap Menu > Settings and tap the required option from the Profile section.
 Multi entity support
Multi Entity Support: Customers can view the dashboard, perform transfers, or view any request summary and submit requests against the entity associated with the customer during login. The feature is enhanced with Experience APIs to retrieve and post based on the Entity ID of the signed-in user.
- The Entity ID selected by the signed-in user flows through the application through the respective Experience API.
- For all fetch (GET) API calls, the system retrieves the results based on the Entity ID of the signed-in user.
- For all add/update/delete calls, the system passes and posts requests against the Entity ID of the signed-in user.
The feature supports the following modules:
| Authentication | Dashboard | Account Overview |
| Credit Card overview | Cheque Management | Card Management |
| Statements | Dispute Transactions | Service Requests |
| PFM | Savings Pot | Account Settings |
| Sign In Settings | Profile Settings | Consent Management |
| Unified Transfers | Manage Transfers | Manage Beneficiaries |
| Bulk Payments | Bill Payments | Foreign Exchange |
| Portfolio Management | WealthOrder | Approval Matrix |
As a part of Multi-Entity, the Service Requests dashboard captures the actions(add, edit, and delete) performed in profile settings. The SRMS requests are captured with respect to entity selection. For example, if the user has updated the primary phone number in Entity-1, the same request will not appear in Entity-2. In the same way, the actions performed are unique to the same entity.
UX Overview
You can add or modify any of the following details. Few features are not applicable for Mobile Native.
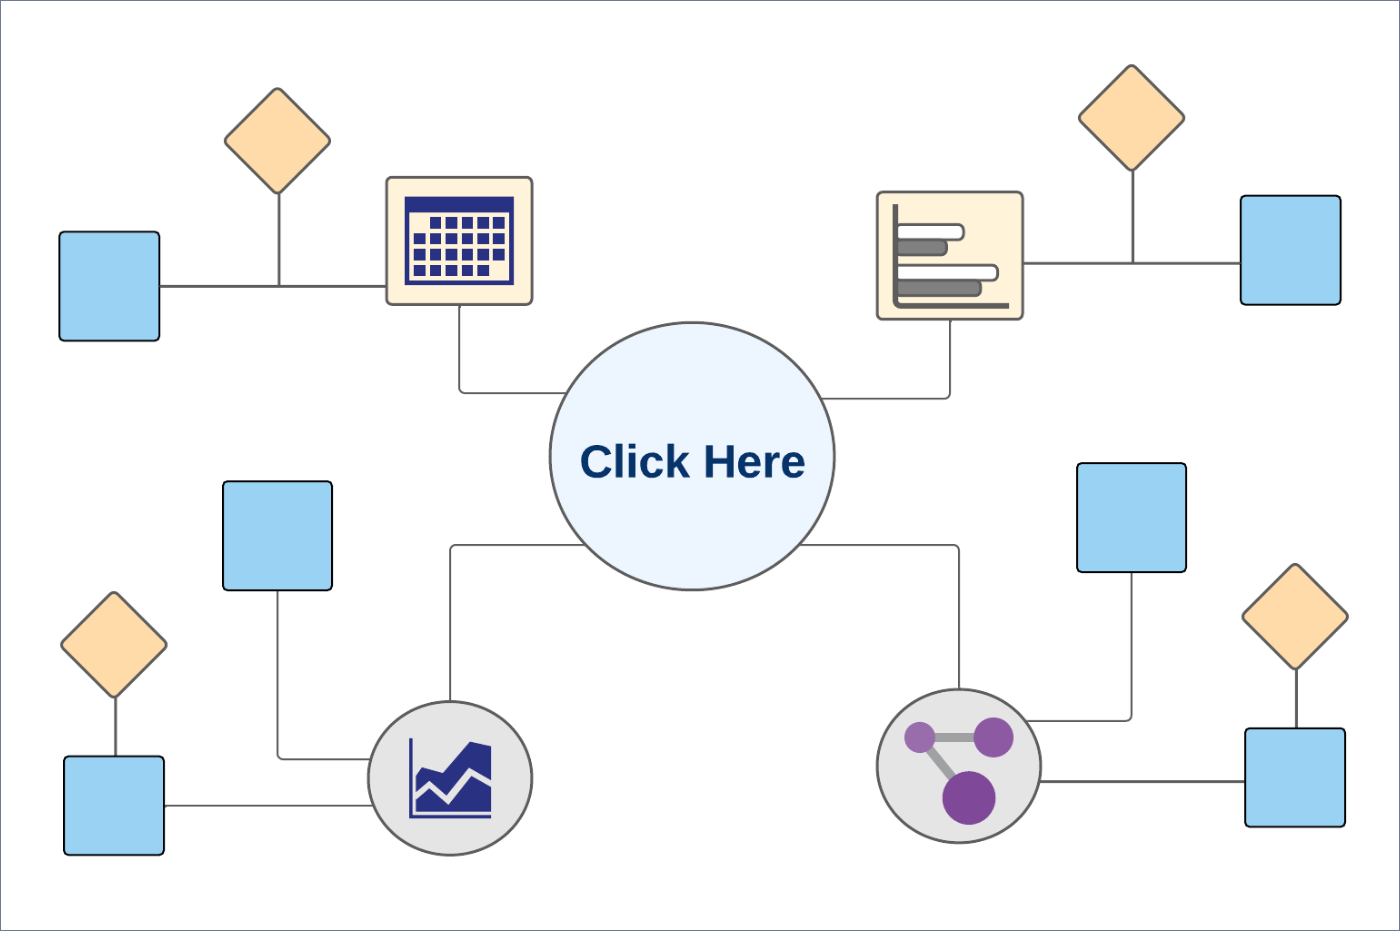
Business Process Diagram - Manage Profile
Web Channel (Online Banking)
You can add or modify any of the following details:
Personal Details
Use the feature add or modify your personal details.
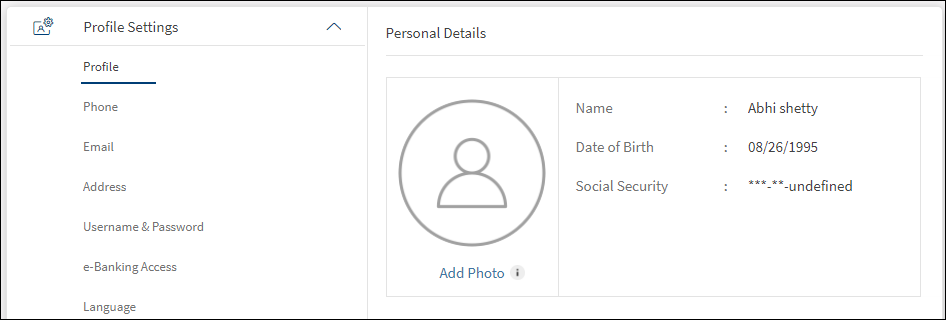
Under the Profile Settings section, click Profile.
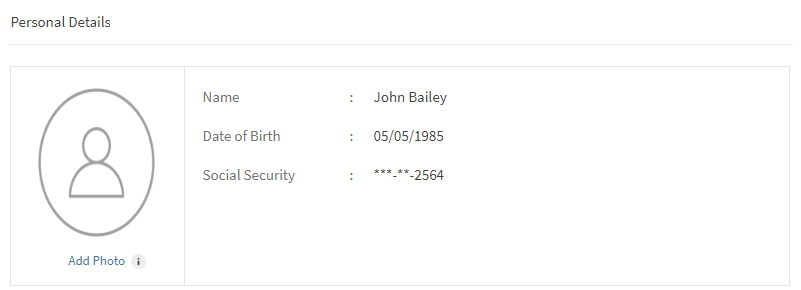
The app displays the Personal Details section, with your name, date of birth, social security number (SSN), and profile picture. The app displays only the last four digits of your SSN and masks the other digits.
The Personal Details of the user vary as per the Entity selection. Each entity can have its name, date of birth, social security number (SSN), and profile picture. The profile details are displayed per the entity selection if the user switches to another entity.
Add Photo
Click Add Photo to add your profile picture. You can browse for a picture from your local system and upload it.
The photo of the user vary as per the Entity selection. Each entity can have unique profile picture. If user switches to other entity, the photo displayed as per the selected entity.
If your profile picture is already existing and you want to modify the image, click Edit.
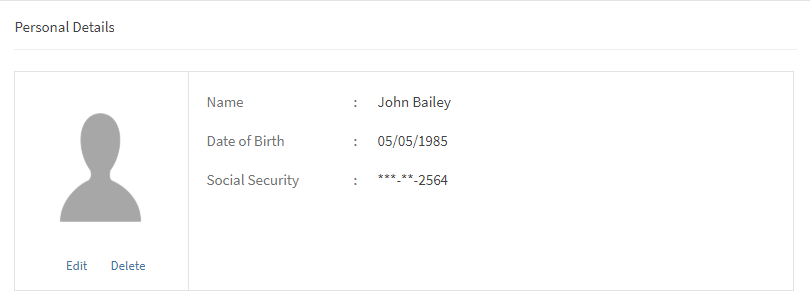
The uploaded profile picture is stored in the Infinity database.
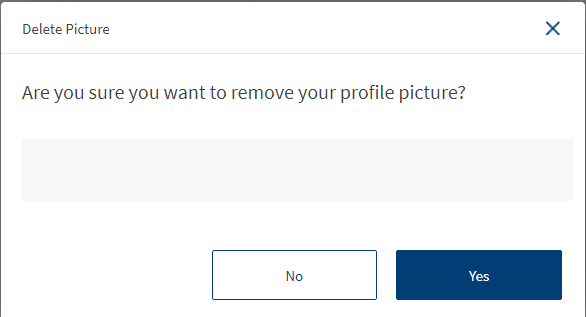
You can delete the uploaded profile picture by clicking Delete. The following pop-up is displayed.
Limitations
- The maximum size of the image to be uploaded is 2 MB.
- If you upload an image greater than the maximum size allowed, an error is displayed and you must re-upload the image.
- The image will be cropped as per the design (circular) to display.
- If an image is already uploaded and if you re-upload another image, the existing image will be replaced with the new image.
- This feature can be configured at the bank level to enable/disable the ability to upload the profile picture.
- If no image is uploaded, a default image is displayed.
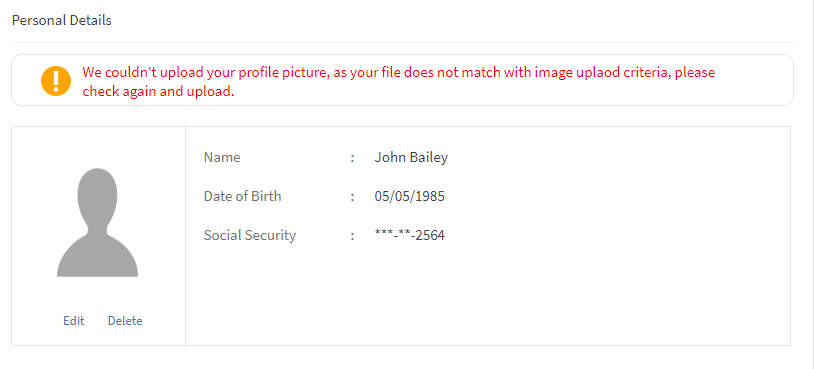
- Recommended file formats to upload the image is .png and .jpg. If you upload an image other than the recommended file formats, the following error message is displayed. You must re-upload the image.
Phone Number
Use the feature to add a new phone number or modify the services linked to a saved phone number.
The phone number of the user varies as per the Entity selection. Each entity can have its own primary and secondary phone numbers. The phone numbers are displayed per the entity selection if the user switches to another entity.
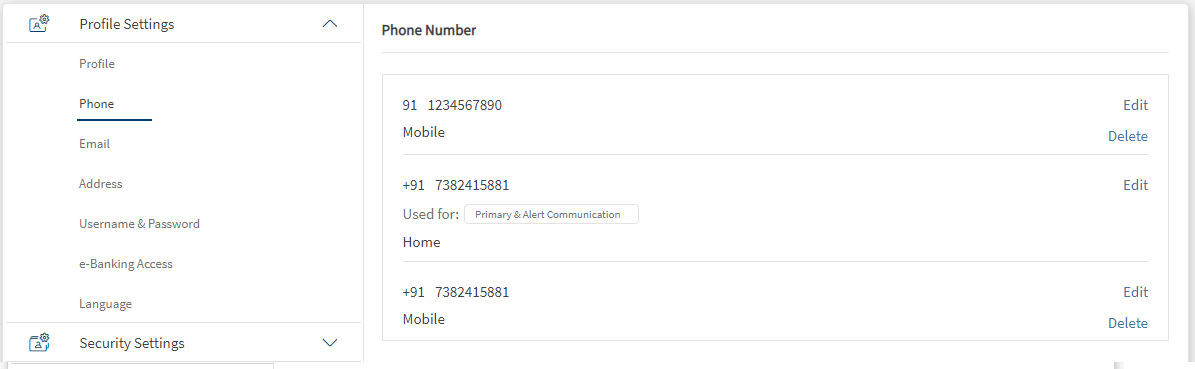
Under the Profile Settings section, click Phone. The app displays the Phone Number section, with the details of your previously added phone numbers. The app indicates the phone number which you have selected as your primary phone number. The app may show more than one primary number. The app receives these details from Transact.
Limitations
- You cannot add or edit or delete primary phone number.
Add a New Phone Number
Click Add New Phone Number. The app displays the Add phone Number screen.
You must specify the following details:
- Type. Select the type of phone number, whether mobile, work phone, or home phone.
- Phone Number. Type the phone with an extension, if any.
- Select the option if you want to save the number as your primary phone number. If you had selected another phone number as primary, the app displays a message that choosing the new phone number as primary will replace the earlier selection.
- Click the check box Mark for alert communication to select the phone number for receiving alerts.
- Click Save. The app adds the new phone number and displays it on the Phone Number screen
You can add up to three phone numbers. If you have already added three phone numbers, the Add New Phone Number button is disabled.
Edit a Phone Number
The app displays the Phone Number Detail screen, with various details that you had previously saved for the phone number.
Click Edit. The app displays the Edit Phone Number screen.
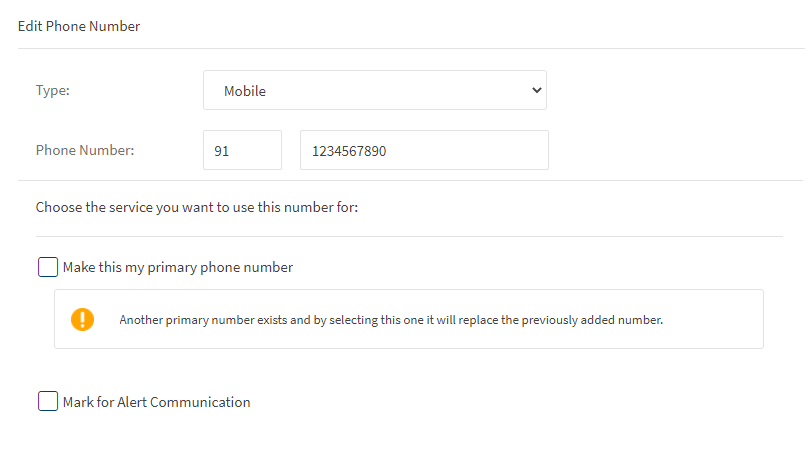
You can modify the details of all the fields: Extension code, Type, Phone Number.
In addition, you can choose to select the phone number as your primary phone number. If you had selected another phone number as primary, the app displays a message that choosing the new phone number as primary will replace the earlier selection. You can choose to mark the phone number for alert communication.
Click Save. The app updates the phone number details and displays it on the Phone Number screen.
Delete Phone Number
You can delete a selected phone number if you do not wish to have the phone number associated to your account. The primary phone number cannot be deleted.
In order to delete a primary number, make the other number as primary. This enables edit and delete action for the earlier primary number.
Click Delete to delete the phone number. A pop-up is displayed asking for a confirmation.
Email ID
Use the feature to add a new email ID. You can also modify the details of a saved email ID or delete an email ID.
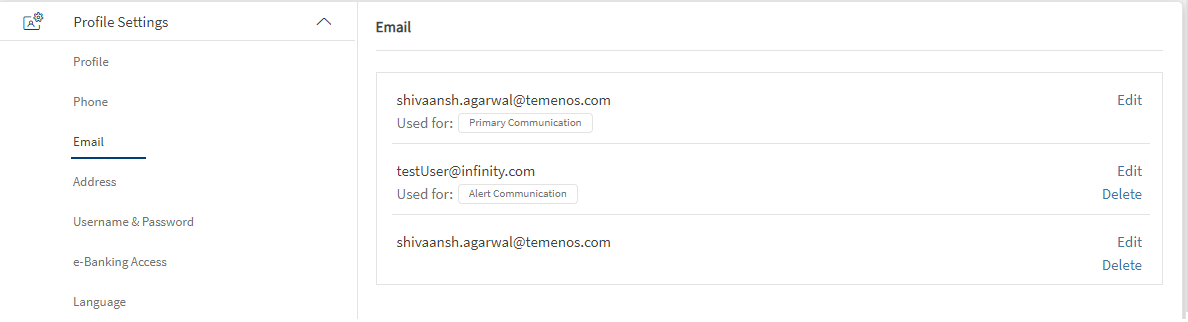
Under the Profile Settings section, click E-Mail. The app displays the Email section, with the details of your previously added email IDs. The app indicates the email ID which you have selected as your primary email address. You can only select one email ID as primary.
The email ID of the user varies as per the Entity selection. Each entity can have its email ID. The email ID is displayed per the entity selection if the user switches to another entity.
Limitations
- You cannot add or edit or delete primary email.
Add a new Email ID
Click Add New Email. The app displays the Add New Email screen.
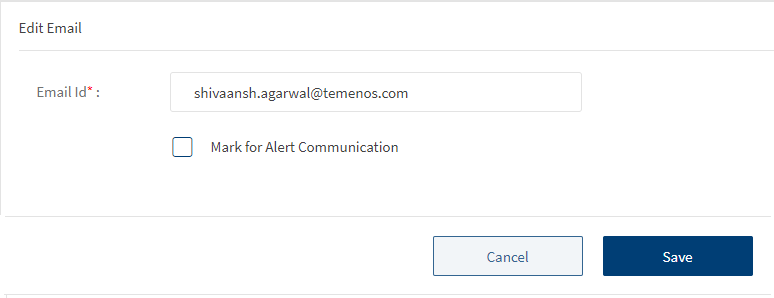
To add a new email ID, follow these steps:
- Type the email address in the Email ID field.
- Select the option if you want to choose the email ID as your primary email address. If you had selected another email ID as primary, the app displays a message that choosing the new email ID as primary will replace the earlier selection.
- Click the check box Mark for alert communication to set the preferred email ID for receiving alerts.
- Click Add. The app adds the new email ID and displays it on the Email screen.
You can add up to three email ids. If you have already added three email IDs, the Add email ID button is disabled.
Edit an Email ID
For the required email ID, click Edit. The app displays the Edit Email screen.
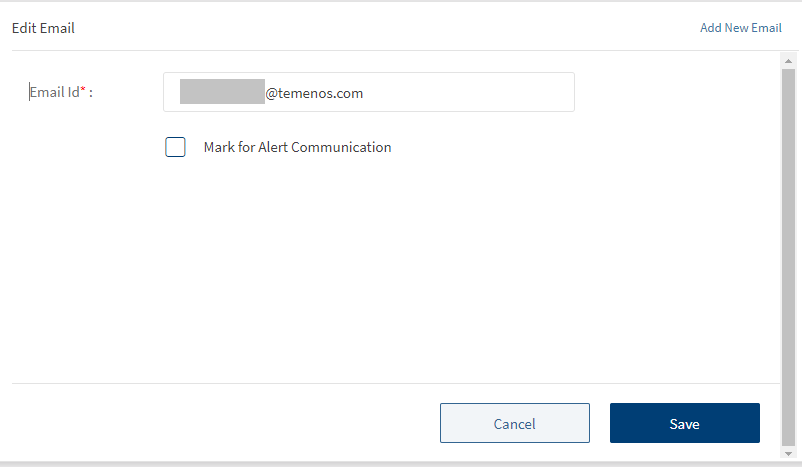
Modify the email address in the Email ID field.
Select the option if you want to choose the email ID as your primary email address. If you had selected another email ID as primary, the app displays a message that choosing the new email ID as primary will replace the earlier selection.
Click Save. The app updates the email ID details and displays it on the Email screen.
Delete an Email ID
For the required email ID, click Delete. The app displays a pop-up message asking if you want to delete the email ID. You cannot delete a primary email ID.
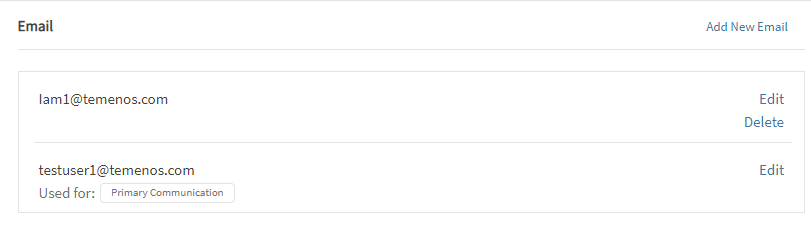
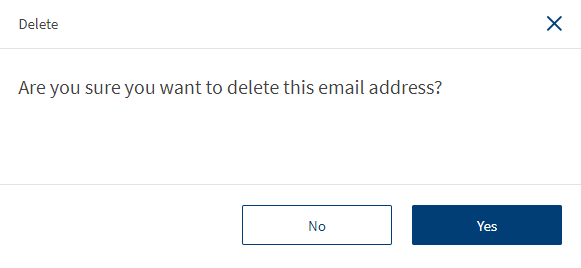
Click Yes. The app deletes the email ID and removes it from the Email screen.
Address
Use the feature to manage primary and secondary addresses.
Menu path: On the Profile Settings section, click Address. The application displays the Address section on the right pane with the details of the previously added Home and Work addresses with the following details.
- Home and Work address details.
- A note to denote the primary address.
- Contextual menu
 with quick actions - Edit and Delete. A user with appropriate permission only can edit or delete an address. While the Edit action is applicable for primary and secondary addresses, the Delete action is available only for secondary addresses.
 - Add New Address: Click to add an address. The button is not displayed if a maximum of three addresses are already added.
The address of the user varies as per the Entity selection. Each entity can have its own primary and secondary address. The addresses are displayed per the entity selection if the user switches to another entity.
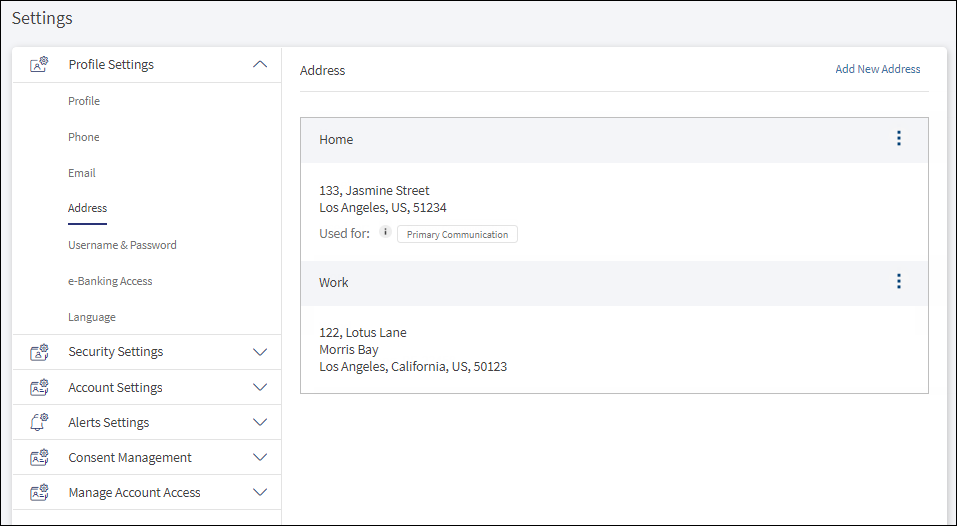
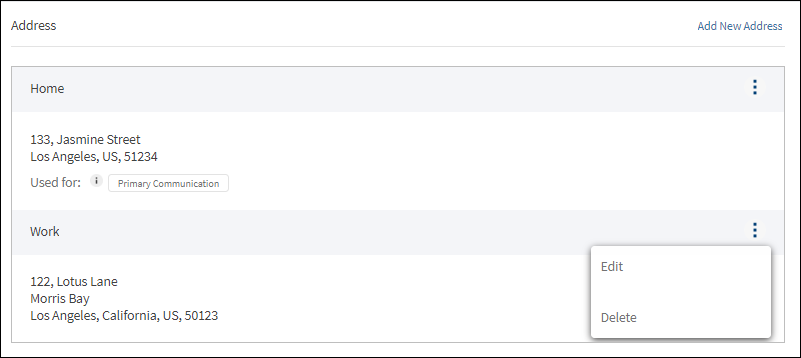
A user with appropriate permission can manage primary and secondary addresses. Note that a maximum of three addresses only can be added.
- Primary address
- Add or edit the address.
- Change the secondary address to primary address.
- To access the features, a user must have the following permission defined in Spotlight:
- Feature: Profile Settings
- Action: Update Primary Address
- Secondary address
- Add or edit the address.
- Delete the address.
- To access the features, a user must have the following permission defined in Spotlight:
- Feature: Profile Settings
- Action: View Profile settings, Update Profile settings
Business Rules
Primary Address
- The Update Primary Address action controls the following features in the servicing application:
- Display the Edit option against the primary address.
- Display the Save as Primary Communication check box when user chooses to add an address.
- Display the Save as Primary Communication check box when user chooses to add or edit a non-primary address.
- The primary address cannot be deleted.
- Service Request configuration: The bank users must set up Request Type: Manage Address and Request SubType: Updateprimaryaddress to handle the change of address request. On successful submission, the request is persisted in SRMS and sent to the backend for processing. The request is updated on the Service Request dashboard where the detailed information about the request is displayed.
Secondary Address
- The Update Profile Settings action controls the following features in the servicing application:
- Display the Add New Address button.
- Display the Edit option against the secondary address.
- Display the Delete option against the secondary address.
- Service Request configuration: The bank users must set up Request Type: Manage Address and Request SubType: Add New Address, Update Address, Remove Address to handle the change of address request. On successful submission, the request is persisted in SRMS and the new/edited address is displayed on the address screen. The request is updated on the Service Request dashboard where the information about the request is displayed.
Add New Address
Use the feature to add an address. A user can add more than one address to the profile and select a primary or preferred address as default delivery address. A maximum of three addresses only can be added in the application. The application does not display the Add New Address button if the user has already added a maximum of three addresses.
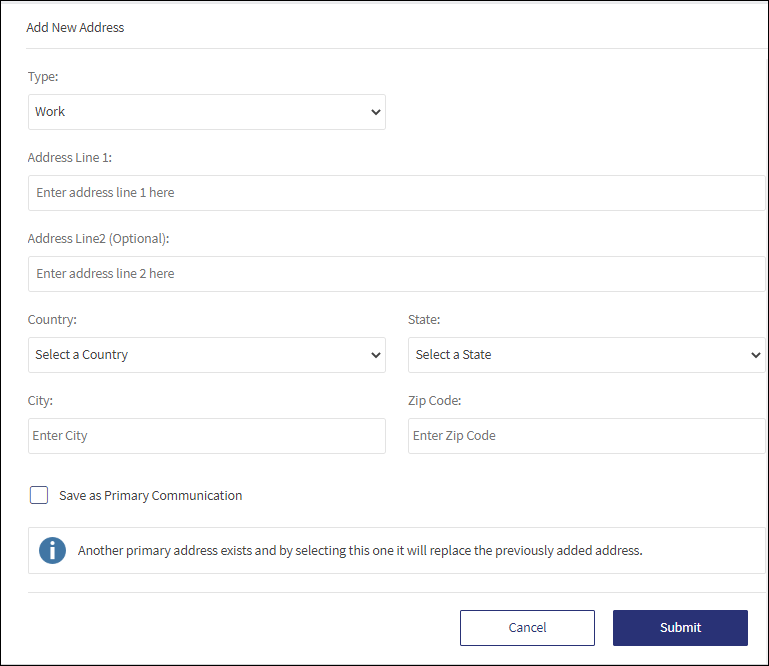
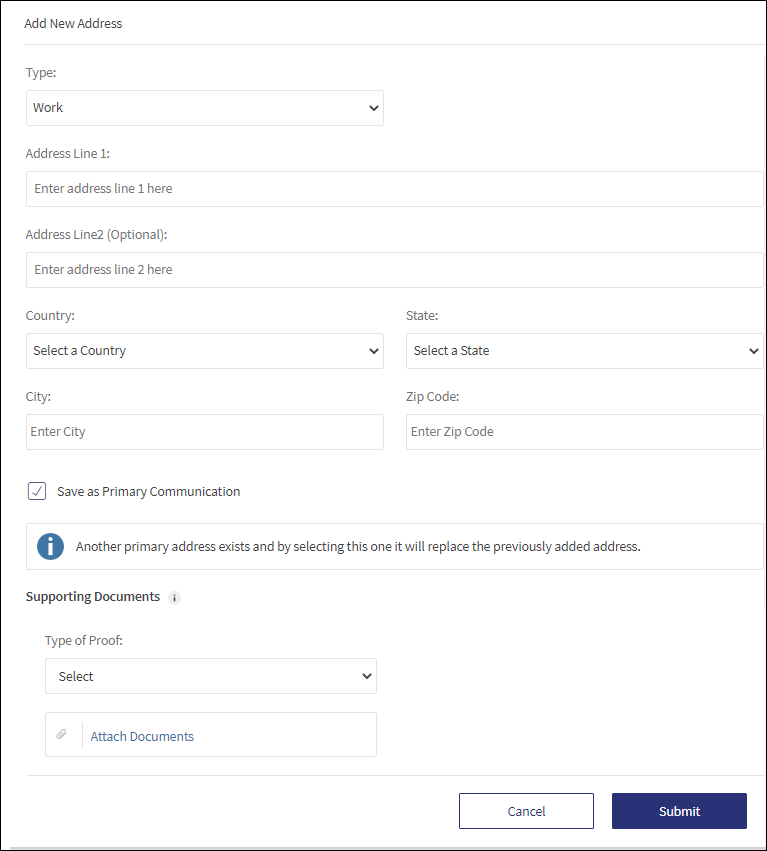
To add an address, follow these steps:
- Click Add New Address. The application displays the Add New Address screen.
- Select the address Type from the list. The options are Work and Home. It is mandatory to select an address type.
- Enter the details in Address Line 1. It is mandatory.
- Enter the details in Address Line 2. It is optional.
- Select the Country from the list. It is mandatory.
- Select the corresponding State from the list. It is mandatory.
- Enter the City. It is mandatory.
- Enter the Zip Code of the city. It is mandatory.
- Save as Primary Communication: Select the check box to choose the address as the primary or preferred address. If another address is already selected as primary, the application displays a message that choosing the new address as the preferred address will replace the previously added primary address. The check box is not displayed if the user does not have the Update Primary Address permission.
- Supporting Documents: This section is displayed only for a primary address if the user wants to request change of primary address by uploading documents as address proof.
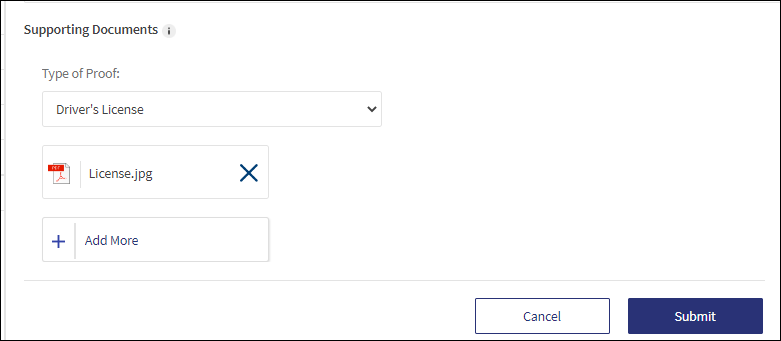
- From the Type of Proof list, select the supporting document such as Passport, Driver's license, Tax ID, National ID, and Utility Bill.
- Click Attach Documents.
- Select the document to attach.
- Do as required:
- Click Add More to attach multiple documents.
- Click X to remove an uploaded document.
- Validations
- Adding supporting documents is optional while adding a primary address.
- A maximum of five attachments are allowed. If the user uploads more than 5 documents, the application displays an appropriate message - Exceeded Maximum No. of Files.
- Only PDF and JPEG formats are supported. If the user uploads the document with file type other than PDF and JPEG, the application displays an appropriate message - Invalid File Type.
- The individual file size cannot exceed 2 MB. If the user uploads the document with file size more than 2 MB, the application displays an appropriate message - File Exceeds Maximum Size.
- The application stores the uploaded documents in the Document Microservice against the respective document ID.
- Click Submit.
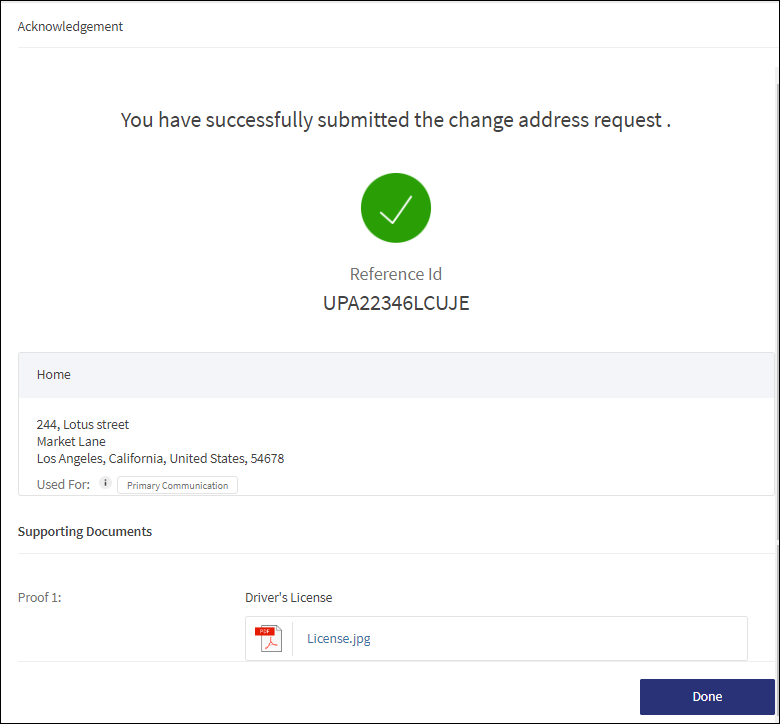
- Acknowledgment: The application displays an acknowledgment screen with Reference ID, address details, and supported documents only in case of primary address change. Click Done to close the acknowledgment screen and navigate back to the Address section. The application adds the new address and displays it in the Address section.
- Post submitting the request, the application displays the address change request and the appropriate request status on the Service Requests dashboard. In case of primary address change, the request type is Update Primary Address and for non-primary address change, the request type is Update Address.
Edit an Address
Use the feature to edit a primary or a secondary address. A user with the required permission only can edit an address.
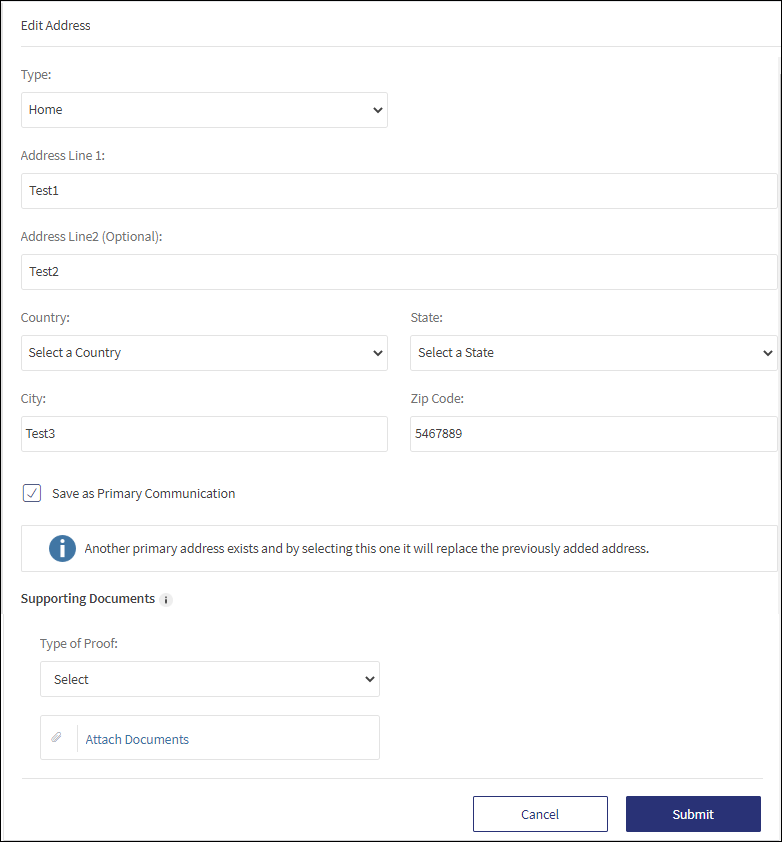
To edit an address, follow these steps:
- On the quick actions of the contextual menu of an address, click Edit. The application displays the Edit Address screen with the current address.
- Modify the details as required. All the fields are editable.
- Save as Primary Communication: Select the check box to choose the address as the primary or preferred address if the address is not already selected. The check box is not displayed if the user does not have the Update Primary Address permission.
- Click Submit. The application updates the address details and displays it in the Address section.
Delete an Address
Use the feature to delete a secondary address. A primary address cannot be deleted. A user with the required permission only can delete an address.
To delete an address, follow these steps:
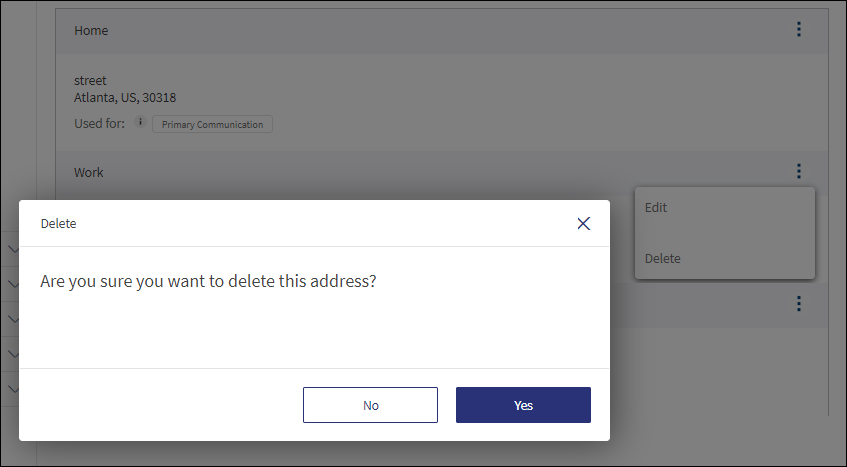
- On the quick actions of the contextual menu, click Delete. The delete option will not be available for a primary address,
- The application displays the Edit Address screen.
- The application displays a pop-up message to delete the address.
- Click Yes. On confirmation, the application deletes the address details and removes it from the Address section.
Password
Use the feature to modify your digital banking password details.
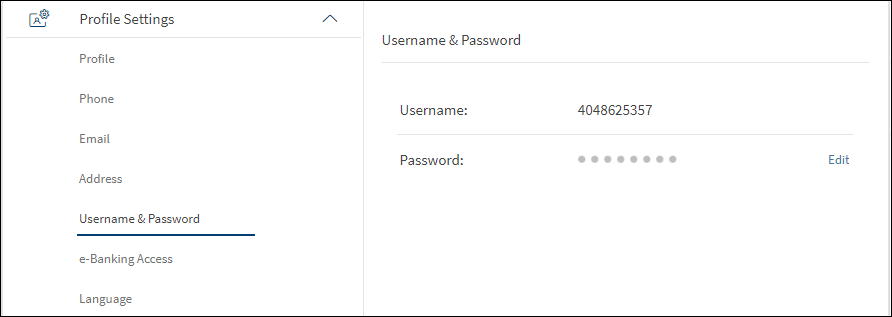
Under Profile Settings, click Username and Password. The app displays the Username and Password screen.
The username and password does not vary as per the Entity selection. All the entities will have same username and password.
Edit Password
Click the Edit link placed beside the Password box. The app displays the Edit Password screen.
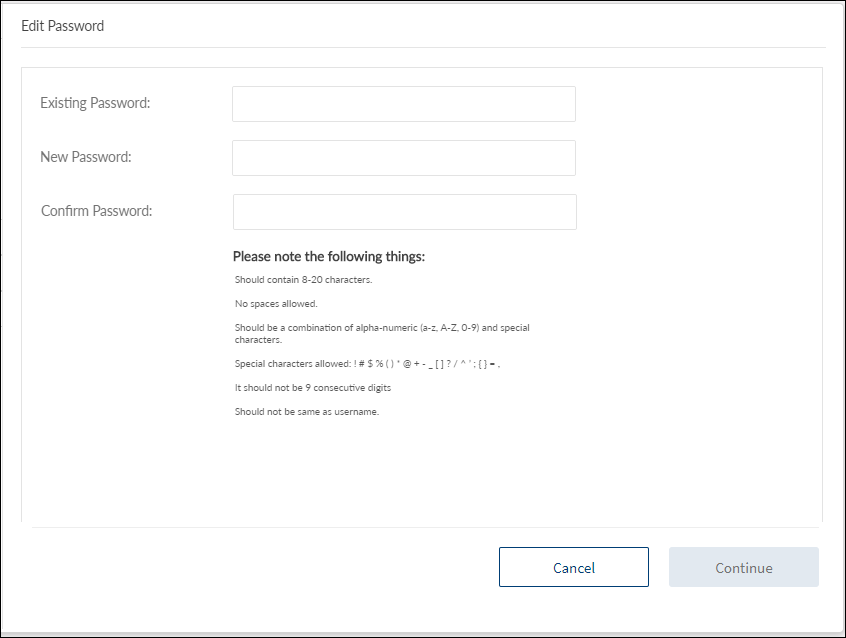
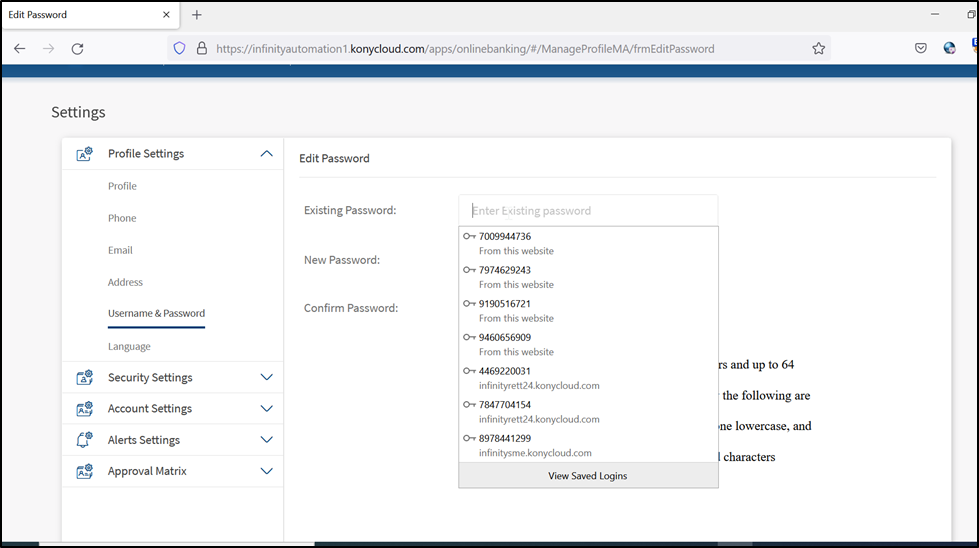
- Enter the Existing Password.
- Enter the New Password.
- Enter the new password again in the Confirm Password box.
- Follow these validations while changing the password:
- It must be between 8-24 characters.
- You must not add any spaces.
- You can use these special characters: # $ % ( ) * @ + - _ [ ? ] / ^ ' ; = ,
- It can be a combination of alpha-numeric (a-z, A-Z, 0-9) and special characters.
- It must not be nine consecutive digits.
- It must not be the same as the previous password.
- The password rules are displayed once you start typing the password in the respective box. The rules disappear once the entry matches with the defined password rules.
- Click Continue. The app displays the Password Verification screen.
- Validate your identity by any one of the following methods:
- Entering a one-time passcode.
- Select the Using Code option. Click Proceed. The app displays the Security Settings Verification screen.
- Click Send. The app sends the six-digit verification code to your registered mobile number.
- Type the code in the provided field. If you did not receive any code, click Re-Send Code.
- Click Verify, and then click Done. The app updates the password and navigates to the Username and Password screen.
- Answering security questions. If you have not set up your security questions, the app navigates you to the Security Settings Verification screen to enter the OTP.
- Select the Answer Security Questions option. Click Proceed. The app displays the Answer Security Questions screen with two random security questions.
- Type the answers for both the questions.
- Click Verify, and then click Done. The app updates the password and navigates to the Username and Password screen.
- Entering a one-time passcode.
Language
Use the feature to select the required language. Under the Profile Settings section, click Language. The app displays the Language screen. By default, English is selected in the Select Language list.
All entity has same Language. If user updates language, then it is applicable to all entities.
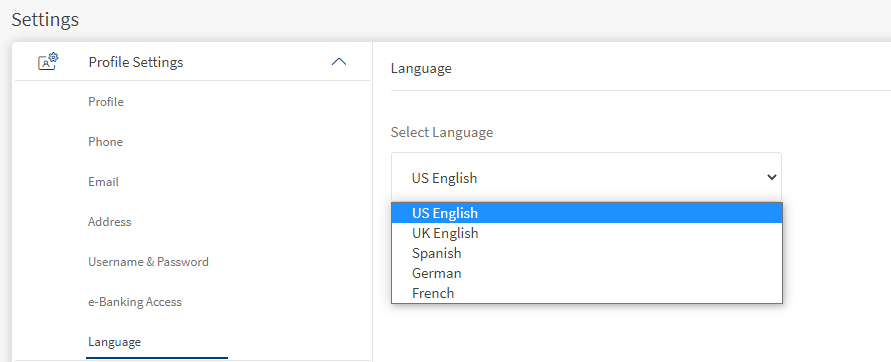
Do the following to change the language:
- Click the Select Language list, the app displays the list of languages available.
- Select the required language, and click Save. The app displays a confirmation screen.
- Click Yes. The language is updated accordingly throughout the application.
When you change the language, the app also changes the Date format, Currency format, and Number format as per the geo-location of the selected language. You can also change the language from the login screen.
e-Banking Access
You can disable your online banking access from your responsive web or mobile applications. You can use this feature in case your password or ipin is compromised and you can quickly stop others from accessing your account and performing transactions.
To disable your e-banking access, follow these steps:
The user can disable e-banking access any available entity.
- Navigate Settings > Profile Settings > e-banking access. The e-Banking access page appears with available entities for user.
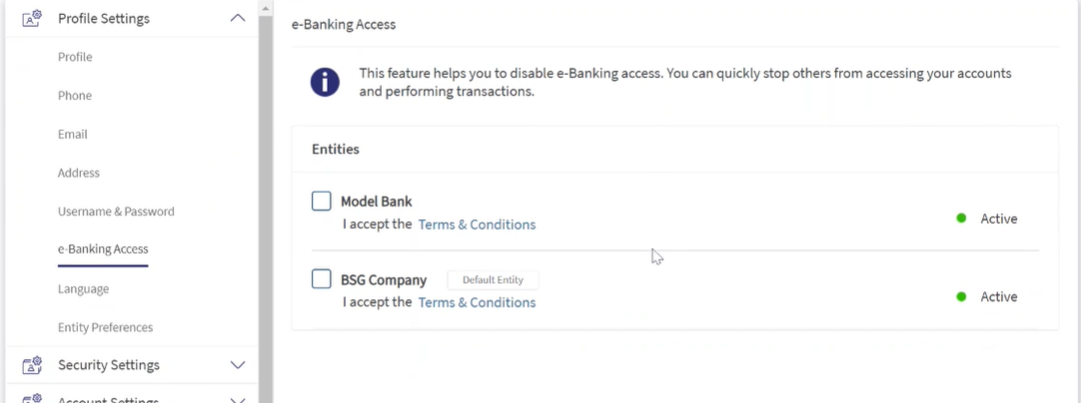
- Select the entities to disable.
You can click the Terms and Conditions link to view the terms and conditions in disabling the e-banking access.
- Click Disable e-Banking access. This button is enabled only after single check box is selected.
- A pop-up appears asking for the confirmation on disabling e-banking access. Click Yes to confirm and No to abort the process.
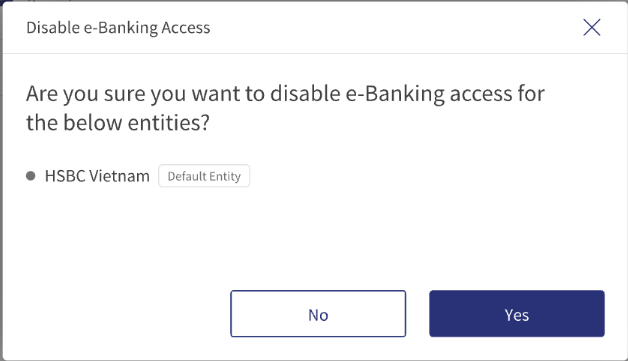
- Clicking on Yes will disable the e-banking access to the default selected entity. The following success message appears and the user have to set default entity manually.
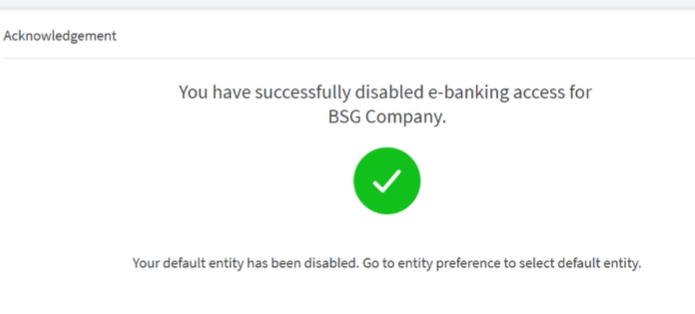
- To re-enable e-Banking access, you must contact your bank.
The user can perform the following scenario in disabling e-banking access.
| Scenario | Result |
|---|---|
| Disable default entity |
|
| Disable current entity |
|
| Disable both default + current entity |
|
| Disable all available entities |
|
| Disable entities neither current or default. |
|
Current Entity. The entity in which the user presently viewing in the application.
Default Entity. The preferred entity of the user when he sign in to the application.
Configuration in Spotlight
The following configurations can be made in Spotlight to re-enable your e-banking access.
- Banks can configure the terms and conditions for disabling online banking access.
- Notify the customer with an alert whenever the online banking profile of that particular customer is suspended.
- Log an event when the bank agent suspends the online banking profile from Spotlight.
- Activate or enable the online banking access from the Spotlight application upon consent from the customer.
Mobile Banking
You can add or modify any of the following details:
- Password
- Personal details
- Language
Change Password
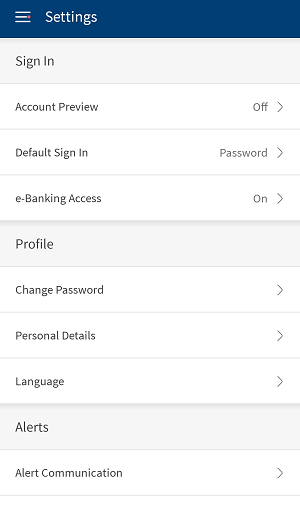
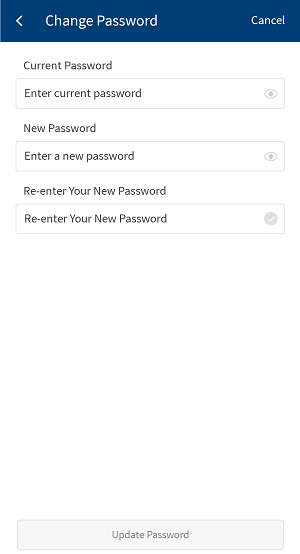
Tap Change Password in the Profile section. The app displays the Change Password screen. Do the following to update the password:
- Tap the Send Security Code link to verify your identity. The app sends a six-digit security code to the registered mobile number as per the bank records. If you did not receive any security code from the bank, tap Resend. Enter the six-digit security code and tap continue.
- The app displays the Change Password screen with a provision to enter the password if the security code is verified successfully. If not verified, the app displays an error message.
- Enter the old password, new password, and enter the new password again in the respective boxes as per the security requirements, and tap Update Password.
The password rules are displayed once you start typing the password in the respective box. The rules disappear once the text matches with the defined rules. - The app displays an acknowledgment message that your password is changed successfully .
Tap cancel on any screen to cancel the changes.
Personal Details
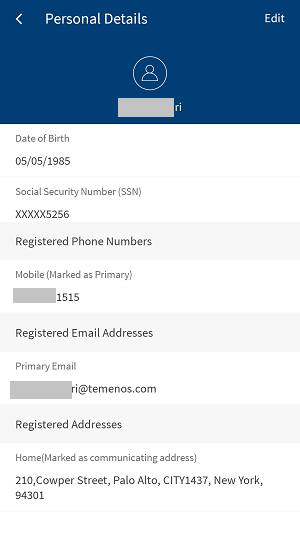
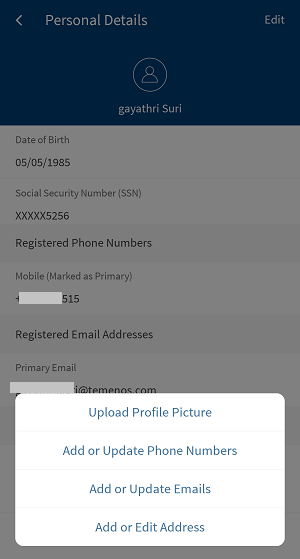
Tap Personal Details in the Profile section. The app displays the Personal Details screen. Tap Edit. The app displays options to upload or change the profile picture, Remove Profile Picture add or update phone numbers, edit email IDs, and edit address details. You can add up to three contact details for every contact type. Do the following to update the required details:
The personal details of the user vary on the Entity selection.
Upload or Change Profile Picture
To add a profile picture, tap Upload Profile Picture.
If the profile picture is already existing and to update the existing profile picture, tap Change Profile Picture. The app displays options to take a picture, or choose from the gallery.
You can take a new photo by using your device camera, or you can select a photo from your device gallery as your new profile picture.
The profile picture can be different for each Entity.
Remove Profile Picture
To remove the profile picture, tap Remove Profile Picture. A message is displayed asking for the confirmation to remove the profile picture. Tap Yes to remove the profile picture.
Limitations
- This feature can be configured at the bank level to enable/disable the ability to upload the profile picture.
- There is no maximum limit in size to upload the profile picture.
Add or Update Phone Number
To manage phone numbers, tap Add or Update Phone Numbers. The app displays the Edit Phone Numbers screen. You can update the existing number or add a new number.
Each entity can have different primary and secondary phone number.
Do the following to update the existing number:
- Tap on the required phone number. The app displays the Enter Phone Numbers screen.
- Make the required updates and select the alerts check box if you want to receive the alerts on this number. Tap Update Changes. The app displays an acknowledgment message that your phone number is successfully changed. Tap Delete Phone Number if you want to remove the saved phone number. The delete option is not available for primary phone number. You can also swipe left on the required number, and tap Delete to remove from the saved numbers list.
Do the following to add a new number:
- Tap Add New Phone Number. The app displays the Select Contact Location screen.
- Select the required location (Domestic or International). The app displays the Select Contact Type screen.
- Select the required contact type from the list such as home, mobile, work and more. The app displays the Enter Phone Number screen.
- Enter the new phone number and select the check boxes if this number is your primary phone number and also if the number is your international number. If a primary number already exists, the app will prompt you to confirm if you want to replace the primary number.
- Tap Continue. The app displays the Confirm Details screen.
- Tap Confirm and Add. The app displays an acknowledgment that your phone number is successfully added.
You can tap cancel on any screen to cancel the changes.
Add or Update Email
To manage email address, tap Add or Update Email IDs. The app displays the Edit Email IDs screen. You can update the existing email address or add a new email address.
Each entity can have different primary and secondary email.
Do the following to update the existing email address:
- Tap on the required email address. The app displays the Enter Email IDs screen.
- Make the required updates and select primary email check box if you want to make the updated email as the primary email. Tap Update Changes. The app displays an acknowledgment message that your email ID is successfully changed. Tap Delete Email ID if you want to remove the saved email ID. The delete option is not available for primary email ID. You can also swipe left on the required email ID and tap Delete to remove from the saved email IDs list.
Do the following to add a new email ID:
- Tap Add New Email ID. The app displays the Enter Email IDs screen. If you are using a tablet, on the Personal Details screen, tap the plus sign placed against Registered Email IDs.
- Enter the new email address.
- Select the primary email check box if you want to make the new email as primary email, and tap Continue. If you are using a tablet, tap Add Email ID.
- The app displays an acknowledgment message that your email ID is successfully added.
You can tap cancel on any screen to cancel the changes.
Add or Edit Address
To manage address details, tap Add or Edit Address. The app displays the Edit Address screen. You can update the existing address or add a new address.
Each entity can have different address.
Do the following to update the existing address:
- Tap on the required address. The app displays the Select Address Type screen.
- Select the required type from the list. The app displays the Edit Address screen.
- Make the required changes and tap Continue. The app displays the Confirm Details screen.
- Tap Confirm and Add. The app displays an acknowledgment message that your address is successfully changed. Tap Delete Address if you want to delete the saved address. You can also swipe left on the required address, and tap Delete to remove it from the saved addresses list.
Do the following to add a new address:
- Tap Add New Address. The app displays the Add Address screen. If you are using a tablet, on the Personal Details screen, tap the plus sign placed against Registered Addresses.
- You can either search for the required address using Search or add the address manually. All fields are mandatory. Tap Continue. The app displays the Select Address Type screen.
- Select the required type from the list. The app displays the Confirm Details screen.
- Confirm the details and select the Communicating Address check box if you want to make this address as your communication address for the future.
- Tap Confirm and Add. The app displays an acknowledgment message that your address is added successfully.
Language
Use the feature to select the required language. Tap Language. The app displays the Language screen with the list of available languages. By default, English is selected. Tap the required language from the list and tap Update Language. The language is updated accordingly throughout the application. When you change the language, the app also changes the Date format, Currency format, and Number format as per the geo-location of the selected language.
All entity has same Language. If user updates language, then it is applicable to all entities.
You can also change the language from the login screen.
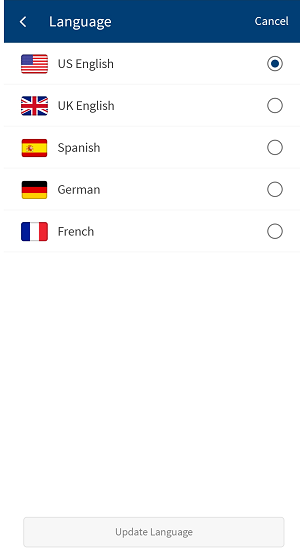
Configuration
- The credential policies for updating password is managed within Spotlight application.
- All profile information updates are stored in the Spotlight DB.
- In Spotlight, the use should have the following feature action to view or update the Profile Settings. If the user is not configured for the following feature and actions, the profile setting will not be displayed in the banking application.
- Feature - Profile Setting
- Actions -
- View Profile Settings
- Update Profile Settings
APIs
For the complete list of APIs shipped as part of this feature, see Experience APIs documentation.
| Service Name | URL |
|---|---|
| updateUserProfileImage | /services/data/v1/RBObjects/operations/DbxUser/updateUserProfileImage |
| deleteUserProfileImage | /services/data/v1/RBObjects/operations/DbxUser/deleteUserProfileImage |
| getUser ProfileImage | /services/data/v1/RBObjects/operations/DbxUser/getUserProfileImage |
| Application | /services/data/v1/RBObjects/objects/Application |
| getUserDetails | services/data/v1/RBObjects/objects/User |
Extending Profile Pic Update
The extension scenario for Profile pic update is about modifying the maximum image size that can be uploaded. Currently, by default 2 MB is the maximum size a customer can upload their profile picture. we can increase or decrease the size in the code based on our requirement.
In responsive web, the default image size is hardcoded in the code. A customer cannot upload an image more than 2 MB. In native, there is no limitation on the size. After uploading the image using image compression code the size will be reduced to 2MB.
Profile Management feature code is maintained in frmProfileManagementController.js java script file. selectedFileCallback method is called for uploading the image in the Profile management system.
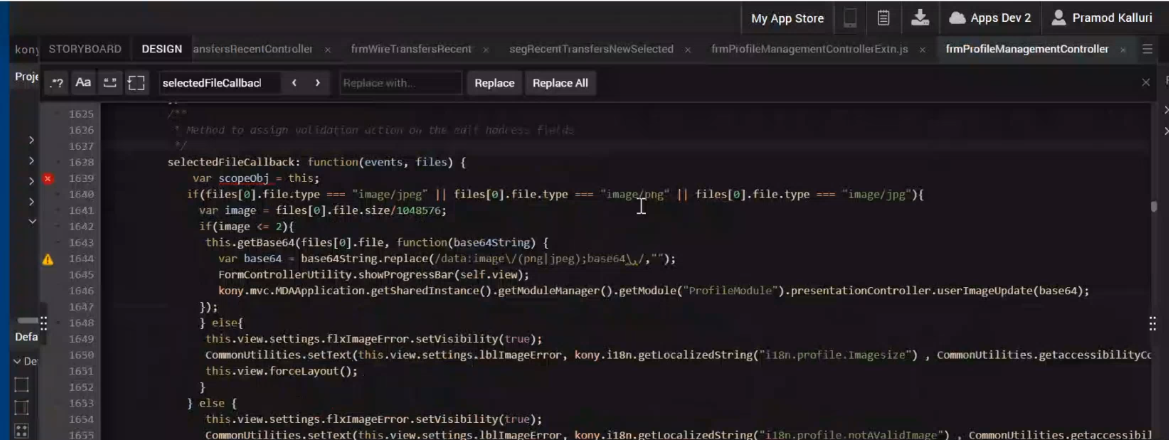
For Profile pic update feature, the code level changes can be performed only at form controller level that is frmController.js. There are no changes at the Presentation Controller and Business Controller level.
Responsive Web
Scenario: When the customer clicks Add Photo button in the application, btnAddPhoto.onClick function calls selectedFileCallback method in frmProfileMangementController.js. In the existing scenario, the maximum size to upload the profile photo is defaulted to 2 MB. Customer can extend the functionality by modifying the default image size.
To change the default image size to upload the profile photo in the system. Follow these steps:
- Create a new extension JS file in Modules and rename the file
frmProfileMangementControllerExtension.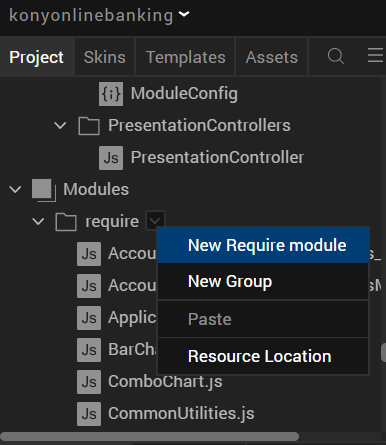
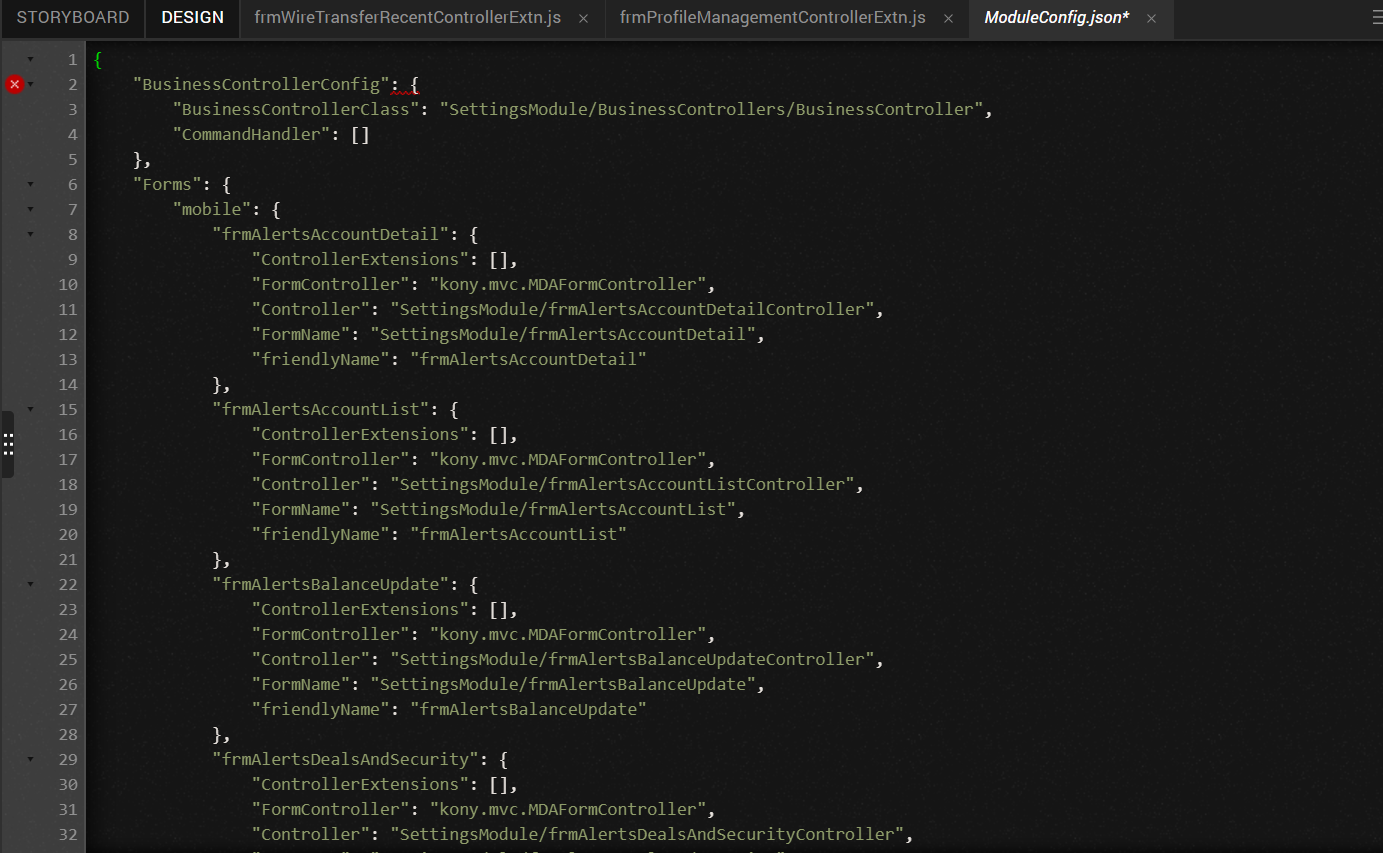
- From the Project Explorer, go to Reference Architecture Extensions > ProfileModule > Config and update the path in module config.
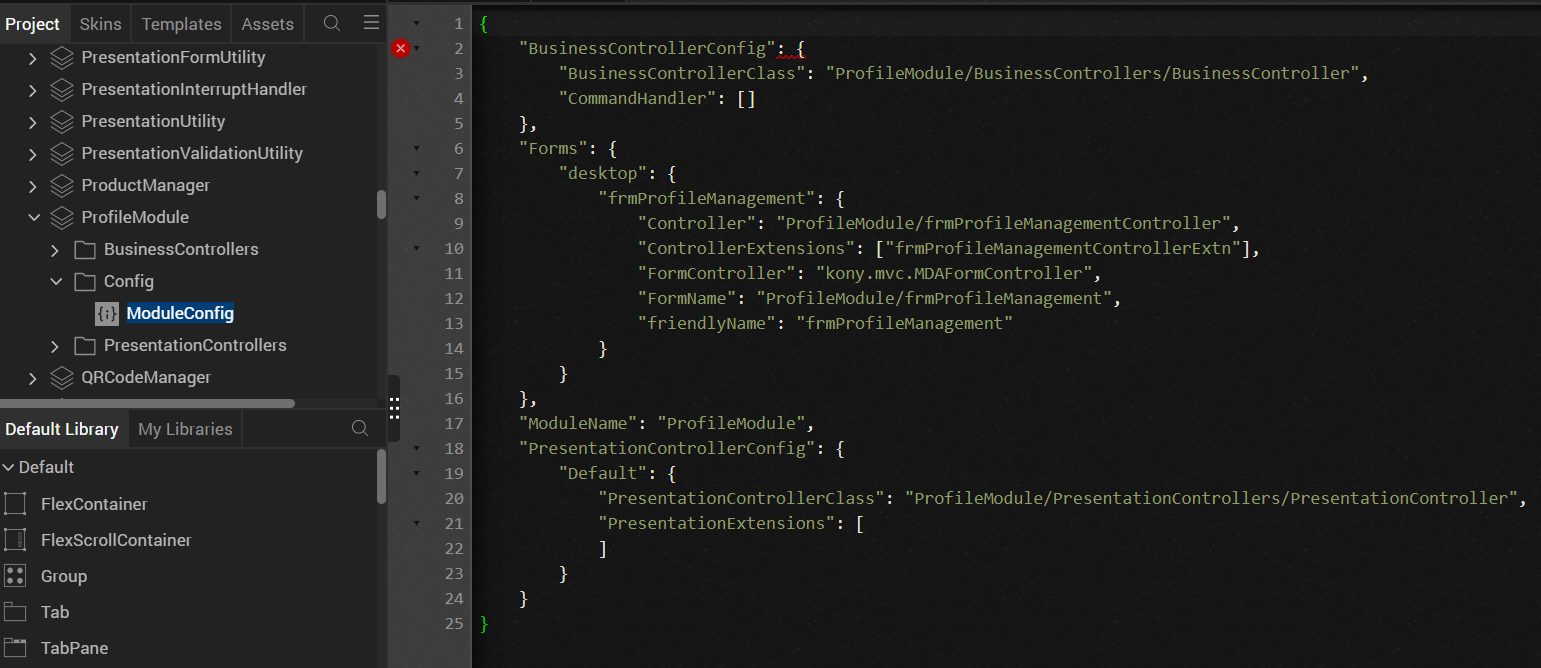
- To redefine the
selectedFileCallbackmethod in the extension file, infrmProfileManagementController.jssearch forselectedFileCallbackmethod and paste the code infrmProfileMangementControllerExtension.js. -
You can make the required validation changes in the
selectedFileCallbackmethod.Here the default image size 2 MB is extended to 4MB by modifying the code as below:
if (image < = 2) is modified to if (image <=4)
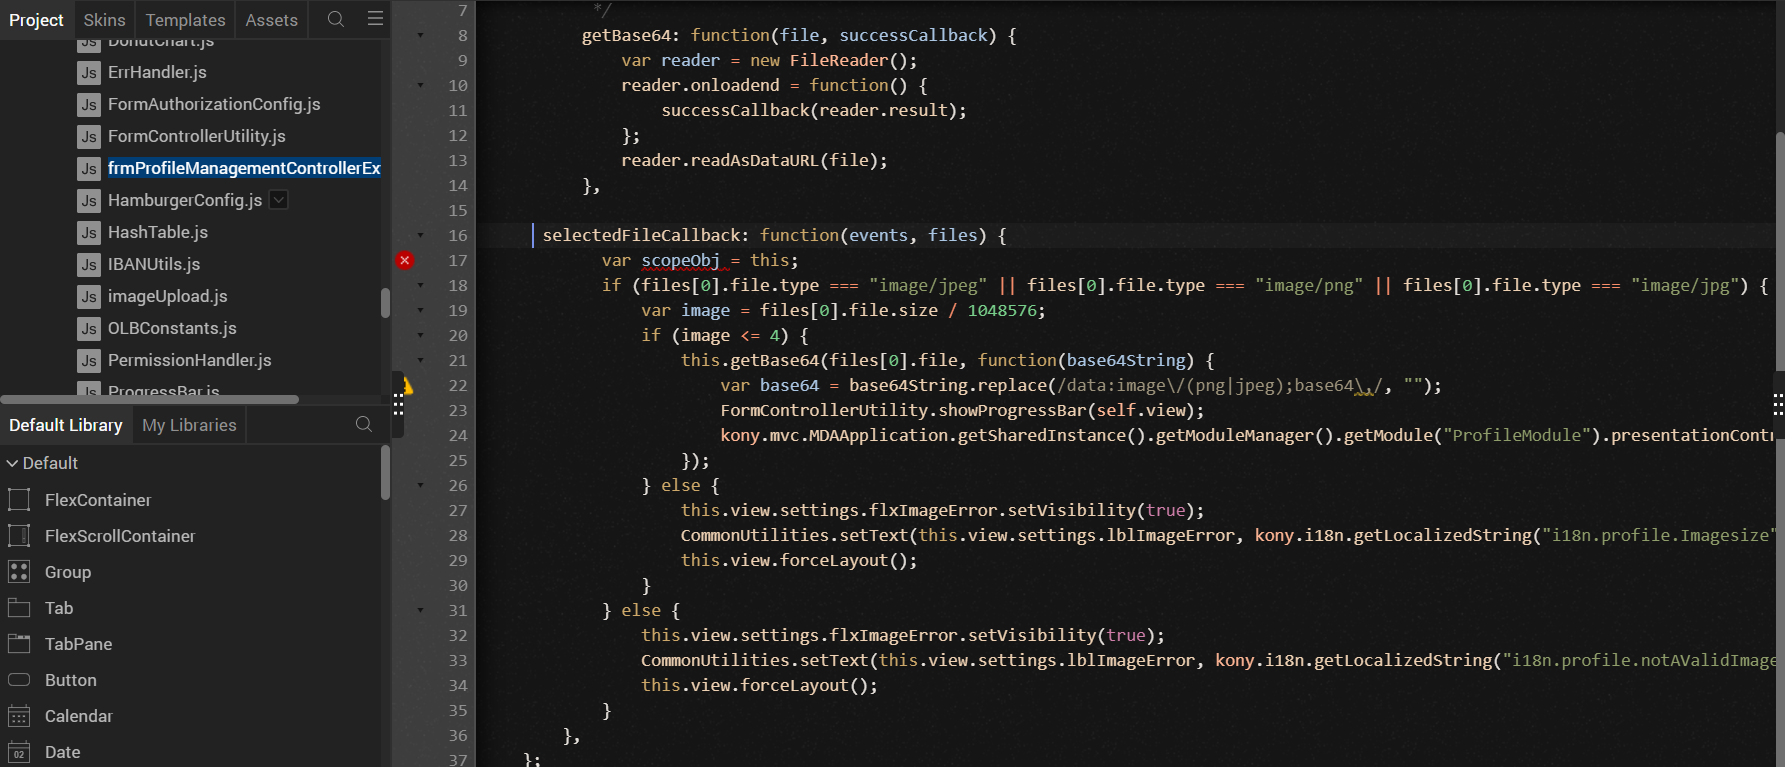
selectedFileCallback: function(events, files) {
            var scopeObj = this;
            if (files[0].file.type === "image/jpeg" || files[0].file.type === "image/png" || files[0].file.type === "image/jpg") {
                var image = files[0].file.size / 1048576;
                if (image <= 4) {
                    this.getBase64(files[0].file, function(base64String) {
                        var base64 = base64String.replace(/data:image\/(png|jpeg);base64\,/, "");
                        FormControllerUtility.showProgressBar(self.view);
                        kony.mvc.MDAApplication.getSharedInstance().getModuleManager().getModule("ProfileModule").presentationController.userImageUpdate(base64);
                    });
                } else {
                    this.view.settings.flxImageError.setVisibility(true);
                    CommonUtilities.setText(this.view.settings.lblImageError, kony.i18n.getLocalizedString("i18n.profile.Imagesize"), CommonUtilities.getaccessibilityConfig());
                    this.view.forceLayout();
                }
            } else {
                this.view.settings.flxImageError.setVisibility(true);
                CommonUtilities.setText(this.view.settings.lblImageError, kony.i18n.getLocalizedString("i18n.profile.notAValidImage"), CommonUtilities.getaccessibilityConfig());
                this.view.forceLayout();
            }
        },
Mobile Native
For mobile native, we do not have any maximum size limit for uploading the image in the application. Customer can upload the image of any size. After uploading, using the image compression code the image will resized to maximum 2 MB.
Unlike responsive web, native has two options to upload the image.
- Take a pic
- Choose from gallery
Scenario: Profile Management feature code is maintained in frmProfilePersonalDetails.js java script file. When the customer clicks Add Photo link in the application, btnAddPhoto.onClick function calls onClickTakePicture (Take a pic) or onClickChooseFromGallery (choose from gallery) methods in frmProfilePersonalDetails.js depending on the user selection. In the existing scenario, using the image compression code the uploaded image is resized to 2 MB. Customer can extend the functionality by modifying the image size in the compression code.
To extend the functionality, follow these steps:
- Create a new extension file in Modules and rename the
frmProfilePersonDetailsControllerExtension.jsfile. - From the Project Explorer, go to Reference Architecture Extensions > SettingsModule > Config and update the path in module config.
- In the
frmProfilePersonDetailsControllerExtensionfile override the form by defining the two methods based on the user action (To take a picture or Choose from gallery).Defining the Take picture method
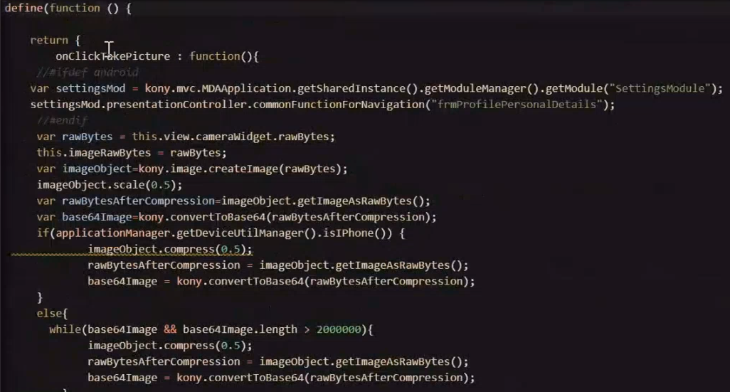
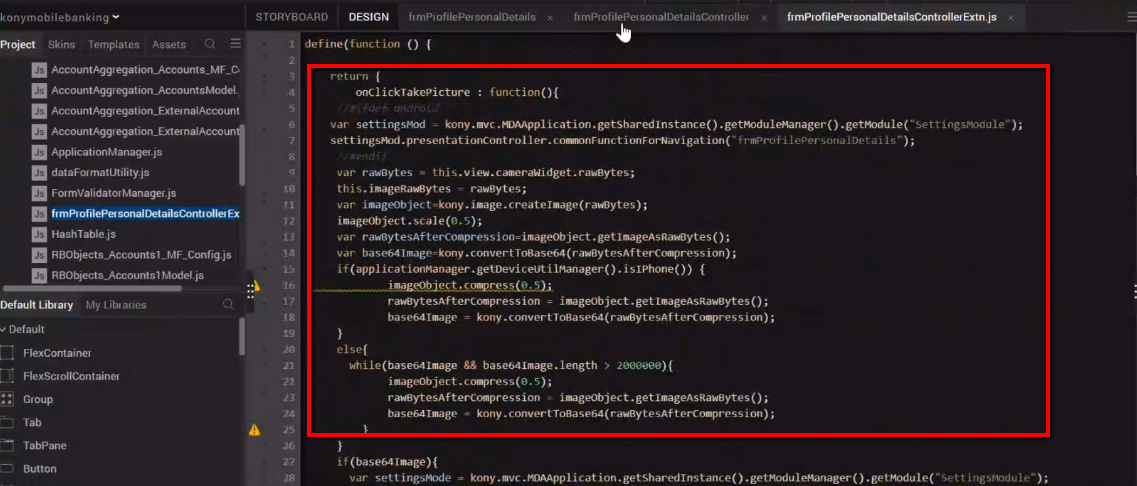
onClickTakePicture : function(){
     //#ifdef android
    var settingsMod = kony.mvc.MDAApplication.getSharedInstance().getModuleManager().getModule("SettingsModule");
    settingsMod.presentationController.commonFunctionForNavigation("frmProfilePersonalDetails");
     //#endif
     var rawBytes = this.view.cameraWidget.rawBytes;
     this.imageRawBytes = rawBytes;
     var imageObject=kony.image.createImage(rawBytes);
     imageObject.scale(0.5);
     var rawBytesAfterCompression=imageObject.getImageAsRawBytes();
     var base64Image=kony.convertToBase64(rawBytesAfterCompression);
     if(applicationManager.getDeviceUtilManager().isIPhone()) {
        	 imageObject.compress(0.5);
             rawBytesAfterCompression = imageObject.getImageAsRawBytes();
             base64Image = kony.convertToBase64(rawBytesAfterCompression);
     }
     else{
       while(base64Image && base64Image.length > 2000000){
             imageObject.compress(0.5);
             rawBytesAfterCompression = imageObject.getImageAsRawBytes();
             base64Image = kony.convertToBase64(rawBytesAfterCompression);
     	 }
     }
     if(base64Image){
       var settingsMode = kony.mvc.MDAApplication.getSharedInstance().getModuleManager().getModule("SettingsModule");
           settingsMode.presentationController.uploadProfilePicture(base64Image);
     }
   },
Defining the choose from gallery method
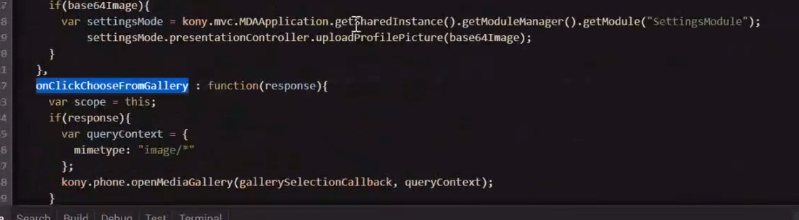
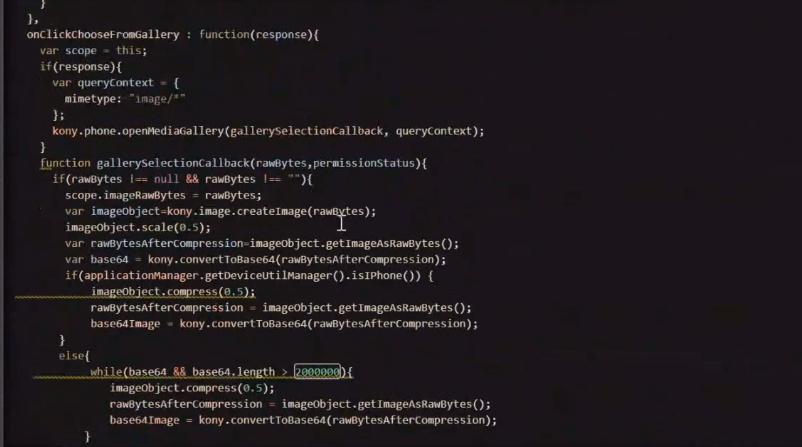
onClickChooseFromGallery : function(response){ var scope = this; if(response){ var queryContext = { mimetype: "image/*" }; kony.phone.openMediaGallery(gallerySelectionCallback, queryContext); } - Make the required extension modifications similar to the responsive web.
- Use the following code to compress the image size, after uploading the image.
The following client code is used to compress the profile picture uploaded from the mobile.
var rawBytesAfterCompression=imageObject.getImageAsRawBytes();
     var base64Image=kony.convertToBase64(rawBytesAfterCompression);
     while(base64Image && base64Image.length > 2000000){
             imageObject.compress(0.5);
             rawBytesAfterCompression = imageObject.getImageAsRawBytes();
             base64Image = kony.convertToBase64(rawBytesAfterCompression);
     }
Code changes to compress the image size for Take a pic
Code changes for image compression when uploaded from the gallery
Follow the same steps as in Responsive Web for changing the image size.
In this topic